Vegetable Korma – Delicately Spiced Indian Vegetable Curry

Vegetable Korma2I love delicately spiced, creamy, flavorful Indian curries. When my friend asked me to make vegetable korma for a potluck, I happily obliged. Some time ago, I shared with you the recipe for Korma with Potato and Peas. In that post, I also introduced you to an interesting spice called black stone flower, (patthar ke phool in Hindi, dagad phool in Marathi and kalpasi in Tamil). If you tried the korma with potato and peas, you will find this recipe easy to follow. It’s also quite healthy.

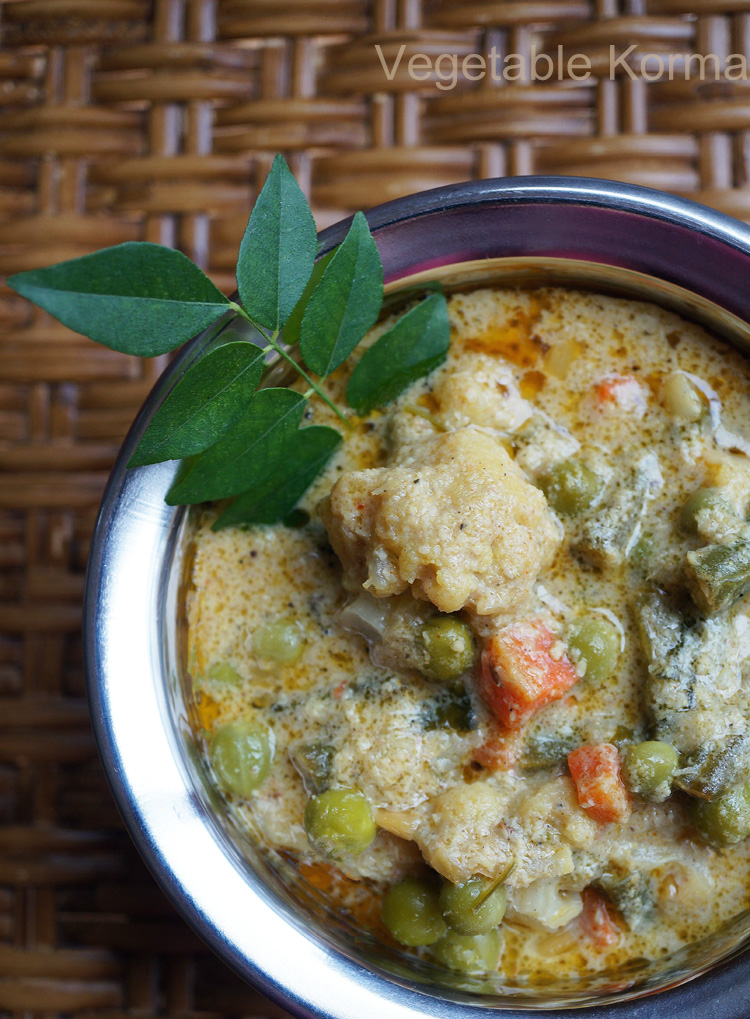
Use a medley of vegetables, that you enjoy the most, to make this dish. I used potatoes, carrots, green beans, cauliflower, and peas. I diced and chopped them into medium size pieces so they would all cook in the same amount of time. I used cashew nuts and coconut to thicken the gravy. You will notice in the ingredients that I’ve listed 2-4 cloves, (depending on your taste). Adjust the amount of cloves and chillies to suit your taste.

Don’t let the long list of ingredients discourage you from trying this recipe. It’s a dish that you will make over and over again.

Vegetable Korma – Delicately Spiced Indian Vegetable Curry
Prep time: 15 minutes
Cook time: 20 minutes
Serve: 8

Ingredients:
4 tablespoons coconut oil or ghee
1-inch piece of cinnamon, broken in half
2-4 cloves, (depending on your taste)
1 star anise
2 pieces of black stone flower, (optional)
½ a petal of mace, (optional)
¼ teaspoon cumin seeds
1/8 teaspoon fennel seeds
1 cup finely chopped onion
2 teaspoons ginger-garlic paste
3 green chillies, (optional, depending on heat and your preference)
1 Roma tomato, (cut, deseeded & diced)
¼ teaspoon turmeric powder
1 teaspoon chilli powder
1 teaspoon coriander powder
½ teaspoon cumin powder
½ teaspoon garam masala powder
1 can coconut milk
4 cups mixed vegetables, (diced and chopped into medium pieces)
1 cup water
4 mint leaves, (optional)
salt
2 tablespoon finely chopped cilantro

To be ground to a paste:
½-inch piece cinnamon, broken into bits
2 cardamoms, outer cover removed
2 cloves
½ bay leaf, (broken into small pieces)
1 teaspoon fennel seeds
4 small pieces of black stone flower, (optional)
10 cashew nuts, (soaked in ¼ cup hot water for 15 minutes)
½ cup grated fresh coconut

Directions:
First, prepare the ingredients to be ground. Add the dry spices (cinnamon, cardamoms, cloves, bay leaf, fennel seeds, black stone flower) to your spice grinder and powder them. Next, add the cashew nuts along with the water it was soaking in and coconut. Grind everything to a smooth paste. Set aside.

Add two tablespoons oil into a large pan and place it over high heat. Add the vegetables and fry them until they turn slightly brown around the edges. About five minutes. Remove into a large bowl. Turn the heat to medium-low. Add the remaining two tablespoons of oil into the same pan. Add the whole spices – cinnamon, cloves, star anise, black stone flower, mace, cumin, and fennel seeds. Sauté for 30 seconds and then add the onion. Cook, stirring occasionally, until the onion turns translucent. Add the ground ginger-garlic paste and cook until the raw smell disappears. Slit the green chillies and add. Sauté for 30 seconds and then add the chopped tomato, turmeric, chilli, coriander, cumin, and garam masala powder. Stir and cook for one minute. Add the coconut milk, vegetables, and ground paste, water, mint, and salt. Stir so all the ingredients are well combined. Cook on medium-high heat until the gravy begins to boil. Turn the heat to medium-low and cook for eight minutes. The vegetables should be cooked but still hold their shape. Garnish with chopped cilantro. Enjoy vegetable korma with plain rice and dal or rotis.

Garbanzo Rice Pulao

Garbanzo Pulao1

We cooked with passion, ate with relish, and celebrated the holidays with gusto! Desserts, chocolates, and delicacies from our home countries were exchanged. We ate what we pleased and nothing was off limits. January 6 is here, and it’s time to get back on track with healthy eating. I’d like to start my blogging year on the right foot. So, my first recipe for this year is vegetarian, vegan, and nutritious. At least, I can say, I’ve started the year with good intentions.

Rice is a staple, in most Indian homes, and you’ll find it on the table every day. Adding garbanzo beans to rice is an excellent way to add fiber, protein, and other nutrients to your diet. Adding a vegetable and a salad to this dish is all you need to make it a complete meal. Some of the vegetable dishes, from my blog, that you could use are: Eggplant in Tomato Curry, Green Bean Thoren, and Cauliflower Subzi.

I used canned garbanzo beans in this recipe. You can also use dry garbanzo beans that you will find in your local grocery store. Just remember, soak them overnight, wash them in several changes of water, and cook them before you use them in this recipe. You can use chillies to make the rice spicy or leave them out completely. This dish is unique in that it is mild in flavor but rich in aroma. Many times that’s the kind of rice dish I’m looking for to accompany bold, flavorful curries. Well, this rice recipe is one of my favorites. You can bump up the flavor by switching water with vegetable stock. It’s a nice change to plain rice and I find that children like it.

Garbanzo Rice Pulao
Prep time: 5 minutes
Cook time: 25 minutes
Serve: 4

Ingredients:
¼ cup ghee
4 black cardamoms
4 green cardamoms
2-inch piece of cinnamon
6 cloves
1 bay leaf
½ tsp cumin seeds
4 dry red chillies, (optional)
1 cup finely chopped onion
3 green chillies, (optional, cut in half)
1 15.5oz can (439g) Goya chickpeas/garbanzo beans, (well drained)
4 cups water
salt
2 cups Basmati rice

Directions:
Wash the rice in three changes of water. Be gently when you wash the rice. Soak in water for 15 minutes.

While the rice is soaking, place a large non-stick pot over medium heat. Add ghee and when it melts, add black and green cardamoms, cinnamon, cloves, bay leaf, and cumin seeds. Stir for 30 seconds to allow the spices to permeate the oil. Add the dry red chillies. Cook, while stirring, for another 30 seconds. Next, add the chopped onion. Stir and cook until the onion turns translucent. Add the green chillies and well-drained garbanzo beans. Cook, stirring occasionally, for one minute.

Turn heat to medium-high and add water. When the water comes to a boil, turn the heat to medium, and add salt. Taste the water, it should taste salty, like the ocean! Drain the rice and add it to the water. Gently stir to combine the rice, water, and spices. Then, allow the rice to cook, undisturbed. The rice will swell and rise to the top. When you see bubbles appearing on the surface of the rice, it is time to cover the dish with a tight-fitting lid. Once you see steam escaping through the edges of the lid, turn the heat to the lowest point, and let the rice cook for eight minutes. Turn off the heat, but don’t open the lid immediately. Allow the dish to rest for five minutes before you serve.

Beef Olathiathu (Spicy Roast Beef)

Kerala Style Beef Ularthiyathu1
Happy New Year! I want to wish each one of you God’s richest blessings in 2015. May the new year bring you good health, peace, happiness, and prosperity.

Beef olathiathu is my all-time favorite Kerala beef recipe. It’s my sister, Leela’s, signature dish and I’m sharing it as a gift to my readers for all the “likes” and comments you made on my Facebook page and here on my blog. I hope you will treasure this recipe as much as I do!

Thanks to my sister, (my Ammama), for teaching me how to make this traditional Syrian Christian dish. In Kerala, in the old days, the meat would be cooked in an urali – a heavy metal vessel, which retains heat for a long time. Today, the urali is replaced with the modern pressure cooker.

The beef is cooked and roasted in coconut oil, which complements the spices perfectly. If you prefer, you may use peanut or grape seed oil. But then, of course, you will lose some of the authentic flavor and aroma. Make this dish for New Year and enjoy the compliments!

Beef Olathiathu (Spicy Roast Beef)
Prep time: 20 minutes
Cooking time: 20 minutes
Serves: 6

Ingredients:
1 pound beef, (washed, drained, and cut into ¾-inch cubes)
40 dry red chillies, (reduce the number depending on heat and your preference)
2 tablespoons coriander seeds
1 teaspoon black pepper corns
1 teaspoon cumin seeds
1-inch piece cinnamon
2 cardamoms
6 cloves
¼ teaspoon fennel seeds
1 cup fresh or frozen coconut pieces, (cut into 1-inch, thin chips)
¼ teaspoon turmeric powder
salt
5 tablespoons coconut oil
½ cup thinly sliced shallots
2 teaspoons finely chopped ginger
2 teaspoons finely chopped garlic
1 tablespoon white vinegar
½ cup water
1 teaspoon mustard seeds
2 sprigs curry leaves

Directions:
In a small non-stick pan, over medium-low heat, dry roast the chillies, coriander, pepper, cumin seeds, cinnamon, cardamom seeds, cloves, and fennel seeds until they smell fragrant. Cool completely and grind to a fine powder in a coffee grinder. Set aside.

Mix the coconut pieces, turmeric powder, and salt in a small bowl. Heat two tablespoons of oil in a pressure cooker over medium heat. Add the coconut pieces and fry until light brown. Add the ground spices, half the shallots, ginger, garlic, vinegar, beef, and water.  Close the cooker and bring to full cooking pressure, on high heat. Reduce to medium heat and cook for ten minutes or until the meat is tender. The amount of time will depend on the cut of beef and your pressure cooker. Allow the cooker to cool gradually. Open the lid and dry roast the beef until all the water evaporates.

To season the meat, heat the remaining oil in a small non-stick pan, over medium heat. Add mustard seeds and when they splutter, add the curry leaves, and shallots. Fry until the shallots turn brown. Add the seasoning to the meat in the pressure cooker. Place the pressure cooker over medium heat, stir and roast until all the pieces are well coated with the spices. You can garnish this dish with sprigs of fried curry leaves, if you desire.

Shakarpara (Shankarpali) – Indian Biscuits

Shakarpara2
Two days to Christmas! Here’s wishing you and your family a Happy Holiday and a delicious New Year!

Christmas is a great time to build lifelong memories with your family. Keeping up with family traditions takes time, energy, and planning. I am so thankful for the memories I have of my family during this time of year.

I am sure many of you have your own Christmas traditions. Please share them with us on my Facebook page or right here on my blog. A few of our family favorites are decorating the Christmas tree, making treats with friends, having family over for Christmas Eve dinner, Secret Santa parties, and of course, a delicious breakfast on Christmas morning (cinnamon rolls are a must)!

Today’s recipe is simple. You will find these little biscuits all over Maharashtra. Shakarpara or Shankarpali, as they are called, are made with all purpose flour, ghee or oil, sugar, and water. These are items you already have in your pantry. All you need to do is knead the dough, let it rest, roll, cut, and deep fry. So, you can even make them today – just in time for Santa’s arrival!

Shakarpara (Shankarpali) – Indian Biscuits
Prep time: 20 minutes (includes rest time)
Cooking time: 30 minutes

Ingredients:
1 cup granulated sugar
1 cup water
½ cup solid ghee, (or 3/4 cup vegetable oil)
5 cups all purpose flour, (approximately)
1 teaspoon salt
2 teaspoons semolina, (sooji, optional)
Oil for deep frying

Directions:
Add sugar, water, and ghee into a saucepan. Place over medium-high heat and stir until the sugar melts. Cool. Whisk flour, salt and semolina in a separate bowl until combined.

Pour the cooled sugar, water, and ghee mixture into the large bowl of an electric mixer, (Kitchen Aid), fitted with a dough hook. With the mixer on slow speed, add the flour, a little at a time, scraping down the bowl, until the mixture comes together. I needed five cups of flour. You might need to add a little more or a little less. Add flour until the mixture comes together into a ball. Turn the mixer on medium speed and knead for three minutes. You can also made the dough without a mixer. Knead with your hands until you have a smooth dough. Let the dough rest for 15 minutes. Knead it again with your hands and then divide the dough into equal portions. Roll to about 1/8 inch thick. Cut into diamond or square shapes.

Add about five inches of oil to a wok or heavy bottomed pan. Heat the oil over medium heat. Then turn the heat to medium-low. Add a small piece of dough. If it rises to the top quickly the oil is too hot. Add a few shakarparas at a time. They must come up slowly. Fry them on low heat so the inside cooks well. Remove when they turn golden brown and drain on paper-towel lined trays. Cool completely before storing them.

Notes:
– I used turbinado sugar for the shakarparas in the picture. The golden crystals are not bleached, so they keep the rich flavor and color of their natural molasses. But I found that the shakarparas were not as sweet as I would have liked, so I coated them with a sugar syrup.
– For the sugar syrup I used one cup granulated sugar and one cup water. Cooked it in a heavy-bottomed pan, over medium heat. When the sugar melted, I add quarter teaspoon lemon juice. The lemon juice keeps crystals from forming. Boil until the sugar reaches one-thread consistency. To do this, keep testing the syrup. Dip a wooden spoon into the syrup and lift out. Allow it to cool. Touch it with your forefinger and then touch your thumb and gently pull apart. When a single thread is formed and it does not break, you’ve reached one-thread consistency. Or use a candy thermometer (234° F–240° F).
– Dip the shakarparas in the syrup, drain the excess syrup with a slotted spoon, and put them on a large cookie sheet. They need to dry out before you store them.

Christmas Treats

Christmas Treats_plate3There are only seven more days to Christmas! Are you ready? My friend and I spent the last two days in my kitchen making Christmas treats for our families. Karanji, rose cookies, namkeen, murukku, ladoo, and chirote are some of the goodies that most Indian homes make during this time of the year. Making these treats can be time-consuming, so about two years ago, I teamed up with my girlfriends to make the process quicker and more fun! While working together we shared stories from our childhood, laughed at pranks we had pulled off, and learned from each other. Time flew by, and before we knew it, we were able to fill our “dabbas” with traditional Christmas delights.

Do you have your own Christmas cooking family tradition? Anyone out there with a good recipe for kul kuls? Please share, either on my Facebook page or here on my blog.

Karanji is everyone’s favorite, so I’m re-posting this recipe for you. I’ve also included a new simple semolina filling.

Karanji final

Karanji with Semolina (Sooji) Filling
Ingredients:
1 cup fine semolina
1 tablespoon poppy seeds/khus khus, (optional)
1 cup desiccated coconut, (unsweetened)
1/4 cup finely chopped nuts, (optional)
1/4 cup golden raisins, (optional)
1 cup fine sugar
1/2 tsp cardamom powder, (optional)

Directions:
Place a large wok, over medium-low heat. Add semolina and dry roast. Stir constantly so it does not burn. It is ready when its turns light brown and smells fragrant. Remove from the wok and put it into a large bowl. Dry roast the poppy seeds for two minutes. Add it to the semolina. Next, dry roast the coconut. Stir constantly until it turns light brown and fragrant. Add the roasted coconut, chopped nuts, raisins, sugar, and cardamom powder to the semolina. Mix everything well. Make this filling a day before you make the karanjis.

Chirote – Flaky Indian pastry

Chirote2
It’s time to give thanks, celebrate, and reminisce. While I was growing up, making Indian sweets, cookies, cakes, and pastries during Christmas was a family affair. It was part of our celebration. Each one of us had a specific task to do in the kitchen. Making the different fillings, kneading the dough, rolling, cutting, frying or baking – whatever it was, the whole family participated. Being the youngest in the family, I got to do the fun parts, like putting raisins in karanjis. I would put two raisins in one karanji and one in my mouth. Needless to say, I was fired from that job!

Too many of these traditions are forgotten these days. My own children don’t know how to make these delicacies. So, before these recipes are completely lost, I want to share them with you. Chirote (also spelled Chiroti) is a popular dessert from Maharashtra and Karnataka. It is a crisp, flaky, deep-fried pastry. The pastry is dipped in a sugar syrup or dusted with confectioners’ sugar. Half a teaspoon of rose water added a touch of elegance to the sugar syrup that I made.

I know that this recipe is long and it looks scary! But one way to tackle it, is to gather some of your friends and you could make them together. I’d love to know what special treats you plan to make for your families this Christmas. Please share them with me, here on my blog or on the MargaretsHome Facebook page. Thank you.

Chirote
Prep time: 1 hour (does not include time to rest dough)
Cooking time: 30 min
Makes: 20

Ingredients:
For the dough
2 cups all-purpose flour, plus 1 cup flour for dusting
3 tablespoons ghee or unsalted butter, melted
1/8 teaspoon salt
water (I used about ¾ cups)

For the rose syrup
1 cup granulated sugar
1 cup water
3 teaspoons lemon juice
½ teaspoon rose water

For the spread
2 tablespoons ghee/butter, melted
2 tablespoons rice flour

For dusting
¼ cup confectioners’ sugar
Use this to dust half the chirotes after you make them.

Directions:
For the dough
Add flour and salt into a large mixing bowl. Stir with a whisk. Make a well in the center and add melted ghee. Add a few tablespoons of water at a time and mix until the dough comes together. Knead to make a firm dough. Cover the dough with a damp towel and let it rest for one hour. You can also made the dough in a stand mixer. Use the dough hook.

For the rose syrup
In a heavy-bottomed saucepan add sugar and water. Place it over medium-high heat. Stir until the sugar dissolves. Simmer over low heat until the sugar syrup thickens (one-thread consistency), about six minutes. Turn off the heat. Stir in the lemon juice and rose essence.

For the spread
In a small bowl, mix melted ghee and rice flour until creamy. Set aside.
(If you live where it is cold during this time of the year, make this after you make the rotis. Otherwise, it will become solid and you have to put in the microwave to soften it. I know, because it happened to me!)

Put it all together
Divide the dough into six even sized portions. Roll each portion of dough between the palms of both hands, using a circular motion, to make smooth dough balls. Flatten each dough ball slightly and place it on a well floured surface. Dust some flour over it and using a rolling pin, roll it into a thin, round shape (like a roti), about 10 inches in diameter. Place each roti on a large plate or tray and cover them with a damp towel. You can place the rotis one on top of the other as long as you have dusted them with flour.

Place one roti on your work surface, smear with one teaspoon of the spread (rice flour and ghee), right to the edges. Dust with a little flour. Place the second roti over the first and again smear it with a teaspoon of the spread. Dust with flour and then place the third roti and smear it with the spread. Dust with a little flour. Starting at the lower edge, roll into a tight log. Stick the edge with a drop of water. Use a sharp knife and a sawing motion to cut the log into ½ inch pieces. Put the pieces on a plate and cover them with a damp towel. Using the same process, make another log with the remaining three dough balls.

There are two methods of making chirotes. For the first method, take one piece and keep the plain, smooth side up.  Roll lightly with a rolling pin to make a long, 2 inch chirote. For the second method, keep the cut edge up, press gently and roll lightly with a rolling pin, making a circle that is about 2½ inches in diameter. Keep them covered with a damp towel.

To show you, I used one log to make chirote which I dusted with confectioners’ sugar and the other log to make chirote that I dipped in rose syrup.

In a heavy-bottomed pot, heat oil for deep frying, over medium-high heat. Once the oil gets hot, turn the heat to medium. Drop three or four chirotes into the oil and fry them on both sides until they turn golden. Drain on paper towels. Sprinkle half of the chirotes, while they are still warm, with confectioners’ sugar. Drop the other half of the warm chirotes, a few at a time, into the rose syrup. Enjoy.

Beef-Free Tacos

Beef-Free Tacos1
Eat beef-free tacos and nobody gets hurt! Many of my friends are eating healthy, turning vegetarian or vegan, and when I develop recipes for my blog, I have them on my mind. I came up with this recipe for beef-free tacos when we got together for game night. For my taco filling, I used Beef-Free Crumble, beefy flavor, made by Beyond Meat. The tacos disappeared faster than I could make them.

All you need to do is make the beef-free filling and spoon it into store-bought taco shells or tortillas. Top them with ribbons of lettuce, diced tomatoes and onions, shredded Monterey Jack cheese, and drizzle with the cilantro, mint and yogurt dressing.

Please note, for this recipe, you won’t need to roast the cumin and coriander seeds. I used a mortar and pestle to crush them coarsely. However, if you don’t like biting into them when you eat, then crush them finely. You can find Beyond Meat products at Whole Foods, Target, and Safeway.

Kudos to all my friends that have chosen to decrease their dependence on animal protein. I’d love to know if you’d like more vegetarian recipes like this one.

Beef-free Tacos
Prep time: 10 minutes
Cooking time: 20 minutes
Serves: 15

Ingredients for filling:
¼ cup oil
2 large red onions, finely chopped, (about 3 cups)
1 tablespoon ginger-garlic paste
3 Roma tomatoes, diced
1 teaspoon turmeric powder
1 tablespoon crushed cumin seeds
1 tablespoon crushed coriander seeds
2 teaspoons Kashmiri chilli powder, (optional; depending on heat and your preference)
¼ teaspoon garam masala, (optional)
1 green bell pepper, diced
2 packets (11 oz, 312 g each) Beef-free Crumble, Beefy flavor
1 can (15.5 oz, 439 g) black beans, drained
1 cup Greek yoghurt, beaten
¼ cup water
salt
2 boxes of Stand ‘n Stuff Taco shells

Directions:
In a large nonstick skillet, heat oil over medium-high. Add onion and cook until the water from the onion evaporates and it turns slightly brown around the edges. Then turn the heat to low, and fry the onion until it turns golden brown. Add the ginger-garlic paste and let it cook for one minute or until the raw smell disappears. Add the tomatoes, turmeric, cumin, coriander, chilli powder, and garam masala. Stir and cook for two minutes.

Add the green pepper, beef-free crumble, black beans, yoghurt, water, and salt. Stir well and cover with a lid. Cook on low heat for five minutes or until all the liquid dries out.

Spoon filling into taco shells or tortillas. Add toppings like lettuce, tomatoes, onion, and cheese. Drizzle with cilantro, mint and yogurt dressing.

Cilantro, Mint and Yogurt Dressing

Ingredients:
2 cups cilantro, roughly chopped and lightly packed
1 cup mint leaves, lightly packed
3 green chillies, roughly chopped, (optional, depending on heat and your preference)
½ teaspoon sugar
3 tablespoons fresh lemon juice
2 tablespoons water
salt
1 cup Greek yogurt

Directions:
Put the cilantro, mint, chilli, sugar, lemon juice, water, and salt into a blender, and make a smooth purée. Pour into a large bowl and add yogurt. Using a whisk, beat well. Drizzle on the taco toppings.

Aloo Mattar Pilaf (Potato and Pea Pilaf)

Aloo Mattar Pulao2I love to play with food and you’ll see that I’ve done just that by garnishing my Aloo Mattar Pilaf (Potato and Pea Pilaf) with a beautiful rose made out of mango peel. Cooking is fun and as they say, you eat with your eyes first. So, take a few minutes to garnish and make your food appealing.

Pilaf, also spelled pilav or pilau or pulao, is rice cooked with spices in a seasoned stock. In India, we add vegetables, fish, meat or dried fruits to our pilaf. Pilaf is a dish that is found in the cuisine of many different countries. Each pilaf is distinctly different from the other.

You’ll find aloo mattar curry on the menu of most Indian restaurants and that’s what gave me the idea of trying a similar recipe in a pilaf style. It turned out to be a hit with my family, so I thought I’d share the recipe with you. It pairs well with a simple cucumber and yoghurt salad. I ate this for lunch yesterday and I was very satisfied!

Here are a few points for you to remember before you start cooking. Parboil or cook the potatoes partially, peel and cut each into four wedges. Make sure you don’t overcook the potatoes. I used peas from a local Indian grocery store, as they are less sweet. Cook the peas in boiling water, drain and shock them in ice so they stay green.

Thanks to those of you who try my recipes and post your pictures on my Facebook page. I  love seeing your results so keep them coming!

Aloo Mattar Pilaf (Potato and Pea Pilaf)
Prep time: 10 minutes
Cooking time: 20 minutes
Serves: 4-5

Ingredients:
2 cups Basmati rice
3 tablespoons ghee, (or coconut oil)
1 cup finely chopped onion
1 bay leaf, (torn in two)
8 cloves
2 star anise
6 green cardamoms, (lightly bruised)
1½-inch piece of cinnamon, (broken in two)
10 whole black pepper corns, (optional)
1 tsp cumin seeds
2 medium potatoes, (parboiled, peeled, and cut into quarters)
3 green chillies, (slit down the middle, optional)
2 Roma tomatoes, (blanched, peeled, and cut into quarters)
1½ teaspoons turmeric powder
1 teaspoon Kashmiri chilli powder, (optional)
salt
3¾ cups water
1 cup green peas, (cooked, drained and shocked in ice)
¼ cup finely chopped cilantro

Directions:
Wash and drain the rice.
Place a large non-stick pot on medium-high heat. Add ghee and when it shimmers add onion. Cook for two minutes or until the onion turns translucent. Do not let the onion turn brown. Turn the heat to low, and add the spices – bay leaf, cloves, star anise, cardamoms, cinnamon, pepper, and cumin seeds. Stir for a minute and then add the potatoes. Turn the heat back to medium-high. Fry the potatoes for two minutes. Next, add the green chillies, tomato, turmeric, chili powder, and salt. Cook for one minute. Add rice and stir gently, until the water from the rice evaporates. Add water and when it comes to a boil, cover the pot with a tight fitting lid, and turn the heat to low. Cook for 10 minutes. Add the peas and cilantro on top of the cooked rice. Turn off the heat and let the rice remain covered and undisturbed for five minutes. Fluff the rice with a fork and serve.

Blueberries and Melon with Honey-Lime Dressing

Fruit Salad

Did you enjoy watermelon, honeydew, and cantaloupe this summer? I look forward to summer because I enjoy the wide variety of fruits that are available. Don’t forget to eat your fruits in the autumn as well! The watermelons that I picked up from the local farm stand recently were the best.

Here is a simple recipe for blueberries and melon with honey-lime dressing. Make it for breakfast, brunch, or for a light supper.

Blueberries and Melon with Honey-Lime Dressing
Prep time: 15 minutes
Serves: 6

Ingredients:
2 tablespoons lime juice
¼ cup honey
1 lb honeydew
1 cup fresh blueberries
A few mint leaves for garnishing

Directions:
Whisk lime juice and honey in a small bowl. Cut the honeydew into bite size pieces and put them into another bowl. Add the blueberries to them. Drizzle honey-lime dressing over them, and toss gently. Serve in pretty individual glass fruit bowls and garnish with a sprig of mint.

Fishless Tuna Cutlets

Fishless Tuna CutletsI’m sure you’ve experienced a “high” from doing something you love. That’s how I felt yesterday when I was writing this blog. I held my second cooking class this past Sunday. The compliments and praise I received for the recipes had my spirits soaring! I met some old friends and even made some new ones. Best of all, the audience relished the food, had fun, and learned how to make four of my favorite Indian dishes. My sincere thanks to those of you who attended and to Calvin David for partnering with me. And, of course, we couldn’t have done it without the assistance of Usha David and Amelia David.

I demoed my Fishless Tuna Cutlets at the cooking class and since they were a hit, I thought I would share the recipe with my readers as well. This recipe can be used in different ways. You could make burgers and serve them in buns like I did in the picture below. Alternatively, you could make cutlets and serve them as a side dish with a meal. They would also taste awesome stuffed in pita bread, with lettuce, tomatoes, onions, and topped with a yoghurt-cucumber sauce. Yum! Try it out and come up with your own way of using this recipe. I’d love to see your results – share them on my Facebook page.

Fishless Tuna Cutlets
Prep time: 10 minutes
Cooking time: 25 minutes
Makes: 10-15

Ingredients:
3 Yukon gold potatoes, boiled, skins removed, and mashed, (about 3 cups)
2 cans (13oz/369g) Fishless Tuna, well drained
1 green bell pepper, finely chopped
1 small onion, finely chopped, (about ½ cup)
1 Roma tomato, diced
¼ cup finely chopped cilantro
5 mint leaves, finely chopped (optional)
3 green chillies, finely chopped (depending on heat and your preference, optional)
3 teaspoons chilli flakes, (depending on heat and your preference, optional)
½ teaspoon whole cumin seeds
2 teaspoons coriander powder
3 teaspoons dry mango powder, (amchur, optional)
¼ cup Bengal gram flour, (besan)
1 egg
salt
Oil for shallow frying

Directions:
Add the potatoes, Fishless Tuna, green bell pepper, onion, tomato, cilantro, mint, green chillies, chili flakes, whole cumin seeds, coriander powder, dry mango powder, Bengal gram flour (besan), egg, and salt into a large bowl. Mix well. Form the cutlets and put them on a small tray.

Place a medium-sized non-stick frying pan over medium heat and add oil for shallow frying. Add a few cutlets at a time. If you over crowd the pan, it will be difficult to turn the cutlets over. Wait until you see the bottom edges of the cutlets turn golden brown in color. Then gently turn them over. Fry the other side until golden. Remove and place on a paper towel lined baking tray.

Notes:
1. Drain the Fishless Tuna and discard the water. Put the tuna in a sieve and press it with a wooden spoon so you can get all the water out before you use it.
2. Have all the ingredients ready before you mix them together, form the cutlets, and shallow fry them. If you mix the ingredients and leave it in the bowl to rest the onion, green pepper, and tomato will give out water which will make it difficult for you to form the cutlets.
3. Fry the cutlets on medium heat until you see the edges on the bottom of the cutlets turn golden brown.
4. If you like tartness, then add the dry mango powder (amchur).
5. Both Bengal gram flour and dry mango powder can be bought from an Indian grocery store.
6. These cutlets freeze well.
7. Fishless Tuna is a product of Atlantic Natural Foods Meatless Select. The cans are available at the Potomac Adventist Book & Health Food Store in Silver Spring, Maryland.

Fishless Tuna Burger1October 22, 2014 – Attaching a picture of the cans for those that asked. If you don’t have a store that sells this, you can contact the company directly: Atlantic Natural Foods Meatless Select at: http://www.foodprocessing.com/vendors/products/2013/atlantic-natural-vegetarian-proteins/
Fishless Tuna Can Pic