MargaretsHome.com turns TWO
Let’s celebrate with Rasmalai

Rasmalai8newI cannot believe I’ve been blogging for two years! That’s 104 posts. My sincere thanks to each one of you who has visited my blog during these past two year. MargaretsHome.com had 38,883 views and 528 comments. Your feedback is important to me. When you call to ask a question or when you tell me that you’ve tried my recipe and it worked out well for you, it makes my day! MargaretsHome.com would not be the same without you. Please continue to visit and I hope I can inspire you to cook some incredible dishes at home. I’m celebrating this milestone with one of my favorite desserts – Rasmalai.

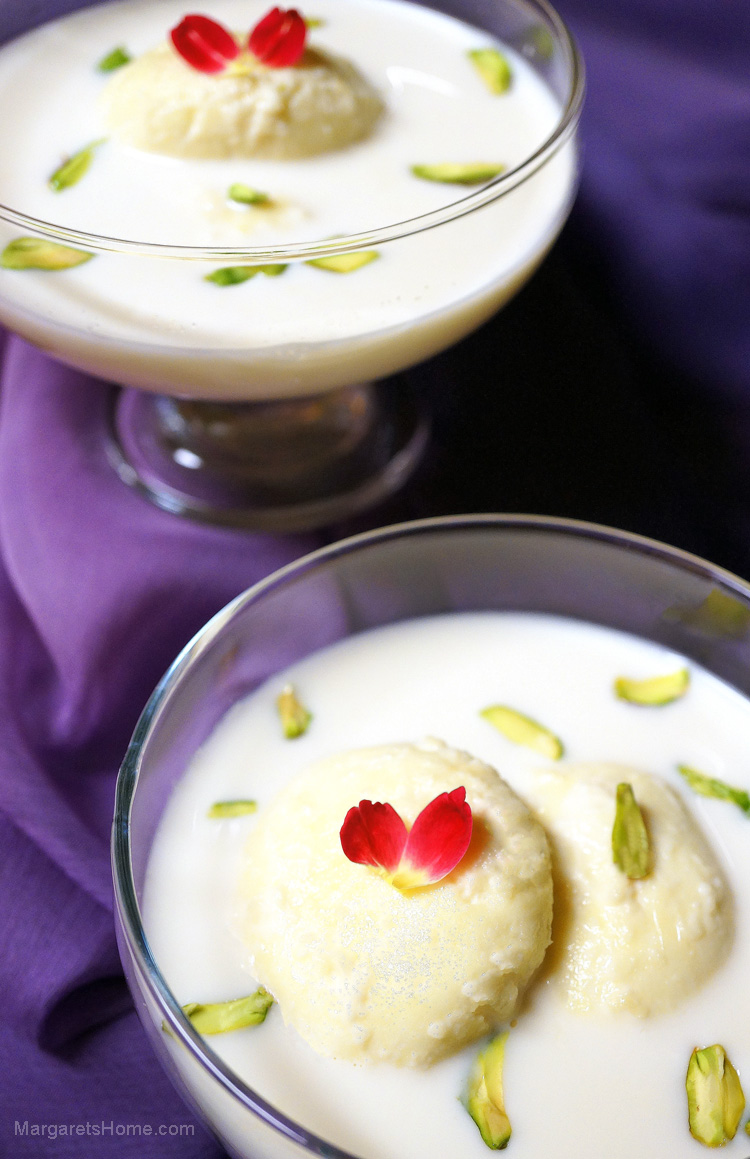
Rasmalai is sometimes spelled Ras Malai. Ras means juice and malai means cream. Wikipedia describes rasmalai as a rich cheesecake without a crust. The recipe that I’m sharing with you is less complicated than the version used by authentic sweetmeat shops in India. In my version, the soft, spongy, cardamom-flavored balls are made with milk powder. Sugar and whole cardamoms are added to whole milk. Then it is boiled and simmered until it becomes thick and rich. The rasmalai balls are then cooked in it until they double in size. Rasmalai is served with some of the sweet, creamy milk sauce and garnished with pistachios.

Rasmalai can been made out of paneer (Indian cheese), ricotta cheese, or powdered milk. I’ve experimented with all three ingredients several times and feel that this recipe is quick, easy and delicious. Adjust the amount of sugar that is added to the milk according to your taste. I’ve tried to give you detailed directions so that the rasmalai will turn out perfectly when you make them for the first time. Follow the instructions carefully and you will have success.

I will be taking a short break from blogging as I am going on vacation. I’m sure my travels will yield even more exciting food experiences and recipes to share with you.

Rasmalai
Prep time: 5 minutes
Cooking time: 40 minutes
Serves: 5

Ingredients:
6 cups whole milk
½ cup sugar, (depending on your taste)
5 whole cardamoms
1 cup Nestle’s Nido full cream milk powder
½ teaspoon all purpose flour
½ teaspoon baking powder
1/8 teaspoon cardamom powder, (optional)
2 teaspoons melted ghee
1 egg, (at room temperature)

Directions:
Pour the milk into a heavy-bottomed, wide, stainless steal pan. Add sugar and whole cardamoms. I cracked open the pods a bit, but you can leave them whole. Bring the milk to a boil over high heat and then turn the heat to medium-low and simmer for 15 minutes. Stir occasionally to avoid the milk sticking to the bottom of the pan.

Sift the milk powder, flour, baking powder, and cardamom powder into a large mixing bowl. If you don’t like the cardamom specks in the rasmalai, skip adding it. But it adds a wonderful flavor to the rasmalai. Add ghee and rub it into the milk powder mixture with your fingertips. In a small bowl, beat the egg lightly with a fork. Add one tablespoon at a time into the milk powder mixture and mix with your fingertips to form a soft and slightly sticky dough. Don’t knead, just bring the whole mixture together into a ball. I used about three and a half tablespoons of egg. Cover with a towel and let it rest for two minutes. If the mixture feels dry add a teaspoon of egg. Add one teaspoon at a time. Take small pieces of the dough and make them into small marble sized balls. Flatten them just a little and put them on a plate.

Bring the milk to a boil again and then immediately turn the heat to low and allow the milk to simmer. Add all the rasmalais into the milk. Cover the pan with a tight fitting lid and let the rasmalai cook for five minutes. Remove the lid after five minutes and gently turn each rasmalai over. Cover and let them cook for another 10 minutes. Take one rasmalai out and check if it is done. Place the rasmalai in a bowl and cut it in half. See if the rasmalai is cooked and looks spongy inside. If not, you need to cook them for another five minutes. When they are done, turn off the heat and leave the rasmalai covered for ten minutes at least. Then gently transfer them into a serving bowl. Let them cool and then chill them overnight in the refrigerator. Garnish with slivered pistachio and serve.

The Barefoot Contessa’s Sour Cream Coffee Cake

Coffee Cake Ina 2

If you’re looking for the perfect coffee cake for brunch – this is it! Ina Garten’s Sour Cream Coffee Cake. It has a light, moist texture with a slight tang from the sour cream. The cinnamon, brown sugar and nut streusel runs through the middle of the cake and also tops it. And, as if that’s not enough, it has a delicious maple glaze that’s easy to make and absolutely yummy.

Be sure to use cake flour because it adds to the light texture of this cake. It also makes a big difference when you have the butter and eggs at room temperature before you get started. I’ve read that there was a typo in her online recipe where it called for 1/4 cup light brown sugar to make the streusel and it should have been 3/4 cup. I kept it at 1/4 cup and it was perfect so I wouldn’t change it. I hope you will enjoy this cake as much as we did.

The Barefoot Contessa’s Sour Cream Coffee Cake
Author: Ina Garten
Total Time:  1 hr 40 min
Prep time:  10 min
Inactive:  30 min
Cook time:  1 hr
Serves:  8-10

Ingredients:
12 tablespoons (1 1/2 sticks) unsalted butter at room temperature
1 1/2 cups granulated sugar
3 extra-large eggs at room temperature
1 1/2 teaspoons pure vanilla extract
1 1/4 cups sour cream
2 1/2 cups cake flour (not self-rising)
2 teaspoons baking powder
1/2 teaspoon baking soda
1/2 teaspoon kosher salt

For the streusel:
1/4 cup light brown sugar, packed
1/2 cup all-purpose flour
1 1/2 teaspoons ground cinnamon
1/4 teaspoon kosher salt
3 tablespoons cold unsalted butter, cut into pieces
3/4 cup chopped walnuts, optional

For the glaze:
1/2 cup confectioners’ sugar
2 tablespoons real maple syrup

Directions
Preheat the oven to 350 degrees F. Grease and flour a 10-inch bundt or tube pan.

Cream the butter and sugar in the bowl of an electric mixer fitted with the paddle attachment for four to five minutes, until light. Add the eggs one at a time. Then add the vanilla and sour cream. In a separate bowl, sift together the flour, baking powder, baking soda, and salt. With the mixer on low, add the flour mixture to the batter until just combined. Finish stirring with a spatula to be sure the batter is completely mixed.

For the streusel, place the brown sugar, flour, cinnamon, salt, and butter in a bowl and pinch together with your fingers until it forms a crumble. Mix in the walnuts, if desired.

Spoon half the batter into the pan and spread it out with a knife. Sprinkle with 3/4 cup streusel. Spoon the rest of the batter in the pan, spread it out, and scatter the remaining streusel on top. Bake for 50 to 60 minutes, until a cake tester comes out clean.

Let cool on a wire rack for at least 30 minutes. Carefully transfer the cake, streusel side up, onto a serving plate. Whisk the confectioners’ sugar and maple syrup together, adding a few drops of water if necessary, to make the glaze runny. Drizzle as much as you like over the cake with a fork or spoon.

Peas and Cumin Pulao – Matar aur Jeera Pulao

Peas and Cumin Pulao2

Recently, I’ve been experimenting with lots of rice dishes. I seem to go through these phases in my life as a recipe developer. I get into the mood of making rice dishes or sweets or meatless meat dishes and keep making them over and over again until I’m satisfied with the recipe. I’ve made at least five different rice dishes in the past two weeks. What amazes me is that my kids never seem to mind and they don’t complain! They eat whatever I cook even when I make similar variations of the same recipe. Thank you Jyoti, Sanjay, and Dharti. You are the best food tasters any mom could ever have, and you are brutally honest too!

Today’s recipe – peas and cumin pulao – has a subtle flavor and occupies a low-profile spot on my dinner table when I want my curry to be the star of the show. It plays its part to enhance and compliment rather than compete with the rest of the items on the table.

I made a bouquet garni or a “potli,” as we call it in Hindi, for this recipe. The process is simple. I crushed the coriander and fennel seeds with a rolling pin. Then I took a small piece of cheesecloth and put the crushed coriander and fennel seeds, cinnamon, black cardamom, and whole black pepper in the middle, brought up the corners making a small pouch, and then tied the mouth with a piece of twine. These spices added a lot of flavor to this particular rice dish, so don’t leave them out.

On another note, I prefer using frozen peas from an Indian grocer rather than from a regular supermarket as they are less sweet. However, both work equally well. Give this recipe a try and I guarantee that you’ll use it time and time again.

Peas and Cumin Pulao – Muttar aur Jeera Pulao
Prep time: 10 minutes (does not include time to soak rice)
Cook time: 30 minutes
Serves: 8

Ingredients:
3 cups Basmathi rice, (soaked in water for 20 minutes)
¼ cup ghee
1 bay leaf, (torn into two)
½ cup sliced onion
3 large green chillies, (optional)
2 tablespoons coriander seeds
2 tablespoons fennel seeds
1-inch cinnamon stick, (broken into two)
2 black cardamoms
1 teaspoon whole black pepper
2 tablespoons cumin seeds
6 cups water
Salt
1 cup peas

Directions:
Wash and soak the rice in water for 20 minutes. Cook the peas in two cups of water. Drain and place in an ice bath so they will retain their color. Put the coriander seeds and fennel seeds in a small zip lock bag. Crush them with a rolling pin. Cut a small piece of cheesecloth (about 4 inches by 4 inches). Put all the spices – crushed coriander and fennel, cinnamon stick, black cardamom, and whole black pepper in the center of the cheesecloth, bring up the corners making a small pouch, and tie the mouth with a piece of twine. Set this potli aside.

Heat a wide, heavy-bottomed pot over medium-high heat. Add ghee, bay leaf, onion, green chillies and the potli. Cook for two minutes and then add the cumin seeds. Stir and cook until the onion turns translucent. Don’t let the onion get brown. Add water and salt. Let the water come to a boil.

Next, drain the rice. Turn the heat down a bit and add the rice. Then once you’ve added the rice, stir gently and turn the heat to medium-high. Let the rice cook and absorb the water. When the water dries up and you see bubbles appearing on top of the rice, cover the pot with a lid. In a few minutes you will see steam escaping through the edges of the lid, turn the heat to low, and allow the rice to cook for 8-10 minutes. Turn off the heat but let the rice remain covered for at least five minutes before you remove the lid. Fluff the rice with a fork and gently mix in the peas. Cover with a lid and let it remain for another five minutes. Remove the potli and dish out the peas and cumin pulao on to a large platter. Garnish with chopped coriander leaves.

Black Eyed Peas Curry – Lobia Curry

Lobia1
There are times when we need to whip up a curry in a hurry. I know many of my readers are mothers that work full time and they need to care for their families too. This dish is easy to prepare. For vegetarians, black eyes peas is a great substitute for meat and a low-calorie option. It is loaded with fiber, potassium, zinc, and iron.

You can buy dry black eyed peas, soak it overnight, cook it in the pressure cooker, and then follow my recipe to make the curry. Save one and a half cups of water that you cook the black eyed peas in because you can use it instead of the water that is called for in this recipe. Or, you can buy black eyed peas in cans from the grocery store and you can skip the soaking and pressure cooking part. The whole garam masala, that is, the bay leaf, cardamoms, cinnamon, star anise, cumin, and cloves add a lot of flavor to this dish so please don’t skip using them.

This curry goes well with rotis or rice. Try it out and let me know how it turns out. Also, if you have a good recipe for black eyes peas, please share it with me.

Black Eyed Peas Curry – Lobia Curry
Prep time: 10 minutes
Cooking time: 25 minutes
Serves: 6

Ingredients:
3 15.5oz (439g) cans of black eyed peas, drained
¼ cup oil
1 cup finely chopped onion
1 bay leaf, torn into two
2 black cardamoms
1-inch piece of cinnamon, broken into bits
½ of one star anise
1 tsp cumin seeds
2 cloves
1 tablespoon ginger-garlic paste
2 cups blanched, skinned, and diced tomatoes
½ teaspoon turmeric powder
1 teaspoon Kashmiri chilli powder
1½ cups of water
salt
1 teaspoon garam masala powder
2 tablespoons kasori methi, crushed
2-3 slit green chillies, (optional)

Directions:
Place a heavy bottomed saucepan over medium heat. Add oil and when it shimmers, add the onion, bay leaf, black cardamoms, cinnamon, star anise, cumin, and cloves. Fry the onion and spices until the onion turns light brown. Add the ginger-garlic paste. Stir constantly and cook for about two minutes or until the raw smell of ginger-garlic disappears. Add the tomatoes, turmeric, and chili powder. Stir well and let the tomatoes cook until the oil separates.

Next, add the black eyed peas, water, and salt. Let it come to a boil. Once it comes to a boil, turn the heat to low and cook for 15 minutes. Finally, add the garam masala, kasori methi, and green chilli. Stir and let it cook for another five minutes. Garnish with chopped cilantro or whole green chillies.


Arugula Salad with a Middle Eastern Twist

Hannah's Salad 1Every now and then my friend, Hannah, and I cook together. It was at one of those sessions that she whipped up this salad for lunch and shared the recipe with me. A salad within a salad, might be the best way to describe this dish. It’s a complete meal, full of protein, and fiber. Thank you, Hannah. It has become one of my favorites.

The Middle Eastern twist takes the ever popular arugula, mango, and avocado salad from ordinary to extraordinary! The recipe that I’ve included for the chickpea, black bean, and spice relish makes more than what you will need for the arugula salad. But I love having extra. It makes for a great side salad, by itself, and keeps well in the refrigerator. You can also combine it with your favorite salads to make them more elaborate, fancy, and nutritious.

I used Trader Giotto’s (Joe’s) Balsamic Glaze to make the vinaigrette. But you can use balsamic vinegar, if you desire. And one more note, before I end. I like choosing an “almost” ripe mango for the salad. That slightly tart-sweet taste of mango adds another dimension to this flavorful salad. You’ve got to taste it, to believe it!

Arugula Salad with a Middle Eastern Twist
Prep time: 10 minutes
Serves: 6

Ingredients:
1 tablespoon balsamic glaze
1 tablespoon fresh lemon juice
1 tablespoon finely chopped shallots
¼ teaspoon sugar
2 tablespoons extra-virgin olive oil
¼ tsp salt
1/8 tsp pepper
5 cups baby arugula, (about 5 ounces)
1 “almost” ripe mangoes, (pitted, peeled and diced)
2 ripe avocados, (pitted, peeled and diced)
1 small red onion, (thinly sliced)
1 cup chickpea, black bean and spice relish, (see recipe below)

Directions:
To make the vinaigrette whisk the balsamic glaze, lemon juice, shallots, and sugar in a small bowl. Slowly pour in the olive oil, while whisking constantly. Season with salt and pepper.

In a large salad bowl, combine the arugula, mango, avocado, and onion. Just before serving, add the dressing and toss gently to coat. Top with one cup of the chickpea, black bean, and spice relish. Serve immediately.

Chickpea, Black bean and Spice relish
Prep time: 10 minutes
Serves: 12

Ingredients:
1 (15.5 oz) can garbanzo beans, (drained)
1 (15.5 oz) can black beans, (drained)
2 ripe Roma tomatoes, (blanched, skinned, and diced)
½ cup diced shallots
½ cup chopped fresh flat-leaf parsley
1 teaspoon chopped mint
3 tablespoons extra-virgin olive oil
¼ cup lemon juice
½ teaspoon cumin powder
1/8 teaspoon chilli flakes, (optional)
1 garlic clove, (minced)
¼ teaspoon black pepper powder
Salt

Directions:
Combine garbanzo, black bean, tomato, shallot, parsley, mint, olive oil, lemon juice, cumin, chilli, garlic, pepper, and salt together in a bowl. Let it sit in the refrigerator for at least 30 minutes, for the flavors to blend. Use about a cup of the relish for the arugula salad and store the rest in the refrigerator for use later.

Eggplant in Tomato Curry

Eggplant and Tomato Curry1

My friends and I enjoyed the mild weather in Maryland last week by taking a long drive over the Chesapeake Bay Bridge to the Eastern Shore. On our way back we stopped by a roadside market to pick up some farm fresh vegetables and fruits. That’s where I found these beautiful, deep purple, glossy-skinned eggplants.

Eggplant is also called aubergine in France and England. In Hindi, it is called baingan. The eggplant’s ancient ancestors grew wild in India and were cultivated in China, Africa, and other parts of the world. Eggplants come in a variety of colors, shapes and sizes. When shopping for them, choose eggplants that are firm and heavy for their size. The skin should be smooth and shiny. Avoid those with scars and bruises.

Eggplants have many nutritional benefits. They are good for heart, brain, and bone health. They contains antioxidants, fiber, and B vitamins. They are also good for weight loss and cancer prevention. With all these benefits, shouldn’t we add more eggplant to our diet? Here’s a recipe to get you started.

Eggplant in Tomato Curry
Prep time: 10 minutes
Cook time: 15 minutes
Serves: 4

Ingredients:
2 large eggplants, cut into large cubes
3 tablespoons oil
1 bay leaf
1-inch piece of cinnamon
1 tablespoon finely sliced garlic
1 cup finely diced onion
4 cups blanched and diced tomatoes
3-4 green chillies, (optional, depending on heat and your preference)
1 teaspoon cumin seeds
1 teaspoon Kashmiri chilli powder, (depending on heat and your preference)
½ teaspoon turmeric powder
1 tablespoon dry fenugreek leaves, (kasoori methi)
salt
½ cup water
1 teaspoon garam masala powder
¼ cup chopped cilantro leaves

Directions:
Place a heavy bottomed saucepan over medium-high heat. Add oil and when it shimmers, add the bay leaf, cinnamon, and garlic. Fry for three seconds and then add the onion. When the onion begins to turn light brown, add the tomatoes. If you are using green chillies, slit them down the center without separating them into two, and add them. Turn the heat to medium and cook until the oil separates. Stir occasionally to make sure that the tomato-onion mixture is not catching to the bottom of the pan.

Next add the cumin, chilli, turmeric, crushed fenugreek leaves, eggplant, and salt. Add water, stir, cover, and cook for 10 minutes on medium heat. Sprinkle garam masala and two tablespoons of the cilantro leaves. Stir gently, cover, and cook for another five minutes. Garnish with the remaining cilantro and serve with rotis or chapatis.

Herbed Turkey Patties

Herbed turkey patties2

Isn’t it wonderful to have friends that readily share their recipes with you? Hannah, is one such friend, and we have a wonderful time cooking together and sharing recipes. Thank you, Hannah, for teaching me how to make these wonderful herbed turkey patties. It was great picking fresh herbs from your garden and using them in the recipe. I was so inspired by your garden, that I’ve started my own little herb garden on my deck.

I’ve modified Hannah’s recipe by changing the shape and served them for breakfast. Its a glorious fusion of herbs and spices – shallots, sage, flat leaf celery, cilantro, thyme, oregano, mint, and chilli flakes. The oyster mushroom sauce added another dimension to the complex flavor in these herbed patties. My family enjoyed every bite.

I made them for breakfast, but you can make them into meatballs as well and serve them for lunch or dinner with spaghetti and marinara sauce. They also serve as great little appetizers. Stick a toothpick into them and serve them with a dipping sauce of your choice. I even enjoyed them as a snack at tea time with sriracha on the side. You can use all the herbs or only those that you prefer. Have fun making this recipe your own.

Herbed Turkey Patties
Prep time: 10 minutes
Cook time: 15 minutes
Makes: 15

Ingredients:
3 tablespoons vegetable oil
1 lb minced turkey
1 tablespoon finely minced shallots
1 tablespoons finely minced sage leaves
1 tablespoon finely minced flat leaf celery
1 tablespoon finely minced cilantro leaves
2 teaspoons finely minced thyme
1 teaspoon finely minced oregano leaves
1 teaspoon finely minced mint leaves
1 teaspoon chilli flakes
2 tablespoons oyster mushroom sauce
1 teaspoon salt, (depending on your preference)

Directions:
In a small bowl, add the minced turkey, shallots, sage, celery leaf, cilantro, thyme, oregano, mint, chilli flakes, oyster mushroom sauce and salt. Mix it well. Wet the palm of your hands and make small lime sized turkey balls and put them on a plate.

Heat a small non-stick frying pan over medium heat. Add 2 teaspoons of oil. Add the turkey balls, as is, or flatten them to about two-inch patties. Put about five at a time in the pan. Keep the heat on medium and fry the patties for two minutes per side or until the patties cook and turn light brown. Remove on to a paper-towel lined plate. Repeat with the rest of the minced turkey mix. If the pan collects a lot of grime, wash and dry it before you fry the final batch of patties. These taste amazing, if you like fresh herbs.

Murukku

Murukku5

True confession – I love Indian snacks and I can live on them. I would rather snack all day than eat my regular meals! Murukku, also known as chakali in Hindi, is a traditional snack from Tamil Nadu. It is most often made by mixing rice flour, black gram flour (urad dal flour), water, salt, and either sesame seeds or cumin seeds. The ingredients are mixed together into a dough and then shaped into spiral or coil shapes by hand or by using a mould. They are then deep fried in oil. There are a number of varieties and it seems like every household has their own secret recipe.

My recipe is fairly easy and if you follow the measurements carefully, making these light, crunchy, salty treats is easy. They last for weeks if they are kept in an airtight container. However, if you are making murukku for the first time, I suggest you start by making only half the recipe. I bought the rice flour and black gram flour from the Indian grocery store and they work beautifully.

I used the murukku mould with its three-hole disc to make these murukkus. The murukku mould that I used was handed down to me by my mother. I’ve included a picture at the bottom of this page. Back in those days, it was made from brass. I remember one of the handles broke and my mom had to have the handle welded back into place. It is now one of my antique kitchen treasures. Do any of you have kitchen treasures that were handed down to you? Please share your comments with us.

Murukku
Prep time: 8 minutes
Cook time: 40 minutes
Makes: 40

Ingredients:
4 cups fine rice flour
½ cup black gram flour, (urad dal flour)
¼ teaspoon asafoetida powder
1 tablespoon sesame seeds
1½ teaspoons salt, (depending on your preference)
6 tablespoons melted butter
1½ cups water (approximately)
Oil for deep frying

Directions:
Put the rice flour, black gram flour, asafoetida powder, sesame seeds, and salt into a large bowl. Use a whisk or your fingers to mix all the ingredients. Add the melted butter and mix again with your finger tips so the butter and flour turn crumbly. To make the dough, I used approximately one and a half cups of water. Use your judgement and add just enough water slowly to make a smooth dough. The dough should not be sticky and there should not be any cracks in the dough.

Heat enough oil for deep frying in a wok (kadai). Use the murukku mould and the three-hole disc to make these murukkus. Make a small ball from the murukku dough that will fit into the murukku mould. Keep the rest of the dough covered with a damp paper towel so the dough will not dry out. I first made about six murukkus on a large zip lock bag and then picked them up one by one and put them into the oil. That way the shape of the murukkus turn out better and you don’t have to hold the mould over hot oil.

Fry the murukkus, on both sides over medium heat, until the sizzling stops. Drain them on paper towels. Let them cool completely before you store them in an airtight container. Have fun snacking!
Murukku Mould

Tamarind Rice – Imli Chawal

Tamarind Rice1

Tamarind rice is a tangy, spicy, nutty, flavor-infused rice dish from South India. Since the dish is made with tamarind, it keeps well without refrigeration. I am sure you will remember that I recently shared my lemon rice recipe with you. Both tamarind rice and lemon rice are popular dishes made by Indian families when they go on picnics and long journeys. There are several variations of this recipe and each dialect in India calls this dish by a different name. Here are a few – puliyodhari, puli sadam, puliyogare, and imli chawal.

Growing up in Pune, India, there were tall tamarind trees right next to my home. I remember plucking and eating raw green tamarind pods with salt and chilli powder. If you’ve done the same, your mouth must be watering just thinking about it! Tamarind pods are about five inches long and contain seeds. When they become ripe the thick, sticky pulp that surrounds the seeds have a sweet-sour taste. It can be found in various forms at the Indian and Asia grocery stores – concentrated pulp, whole dried pods, solid block form, powdered, and also in liquid form in cans. For this recipe, I’ve used the whole dried pods which I soaked in water and extracted the juice.

Did you know one of the ingredients in Worcestershire sauce is tamarind? As the story goes, the famous Worcestershire sauce was originally an Indian recipe that was brought back to Britain by Lord Marcus Sandys, the ex-Governor of Bengal. He took it to a chemist in Worcestershire, England, and asked him to make a batch of sauce from his recipe. They kept the sauce in barrels in a cellar. One day, in the middle of spring cleaning, they came across the barrel and tasted the special mixture. It had mellowed into a great sauce. The recipe was bought from Lord Sandys and today you will find Worcestershire sauce on kitchen shelves around the world. It’s a great story, however, I’m not sure if it is true!

For this recipe, I’ve made the tamarind rice spice powder from scratch. Once you’ve tried it, you will not want to use the store-bought packet again. This spice powder has a long shelf life, so you can store it in a clean bottle and use it to make tamarind rice again.

Tamarind Rice – Imli Chawal
Prep time: 15 minutes (does not include time to soak ingredients)
Cooking time: 35 minutes
Serves: 8

To make tamarind rice spice powder
Ingredients:
1 teaspoon vegetable oil
10-15 whole dry red chillies, (depending on heat and your preference)
½ teaspoon fenugreek seeds
1 teaspoon whole black pepper
½ teaspoon asafoetida powder, (hing)
6 tablespoons sesame seeds

Directions:
You only need a drop or two of oil to roast each of the above ingredients. Heat a small non-stick frying pan over medium heat. Fry all the above ingredients in the sequence that they are listed, one by one. Stir constantly while you roast each of them for 10-15 seconds or until they turn lightly brown and fragrant. When they are ready put them on a plate. Let them cool. Grind to a coarse powder in a coffee grinder. If you grind for too long the sesame seeds will turn oily. So, be careful. You will use only three teaspoons of this spice powder when you make the tamarind sauce. It keeps well and you can use the leftover spice powder when you make tamarind rice again.

To make the rice
Ingredients:
4 cups Basmathi rice
18 cups water
½ teaspoon turmeric powder
1 tablespoon salt
2 teaspoons vegetable oil

Directions:
Wash and soak the rice for 15 minutes. In a large pot, add water and bring it to boil over high heat. Add turmeric powder, salt and oil. Drain the soaked rice and add it to the boiling water. Stir and let the rice cook until al dente or almost done. Drain the water and spread the rice on a large sheet pan to cool.

To make the tamarind sauce
Ingredients:
1 cup tamarind, (tightly packed)
4 cups hot water
¼ cup sesame or vegetable oil
2 teaspoons mustard seeds
½ cup split Bengal gram
½ cup raw peanuts, (you can add up to one cup, if you like)
¼ cup split black gram
5 whole dry red chillies, (depending on heat and your preference)
1 sprig curry leaves
1 teaspoon asafoetida powder
2 teaspoons turmeric powder
1 teaspoons turbinado sugar or jaggery, (optional)
salt
2 tablespoons of sesame oil

Directions:
Soak the tamarind in four cups of hot tap water for 20 minutes. When it is cool, mash it with your fingertips to extract the tamarind juice. Strain the juice into a bowl and taste it to see if the juice is tart enough for the amount of rice that you plan to use. Adjust the tartness to suit your palate. Set it aside.

Put a large (non-reactive) pan over medium heat. Add oil and when it shimmers add the mustard seeds. When they splutter add the Bengal gram. When they begin to turn light brown add peanuts and fry for two minutes or until the peanuts are almost done. Add black gram and fry them until they turn light brown. Next, add the dry red chillies, curry leaves, asafoetida and turmeric. Fry for 10 seconds. Add the tamarind juice. Stir well and let the tamarind sauce thicken. It will take about 20-25 minutes. After the tamarind sauce thickens, add sugar, salt, three teaspoons of the tamarind rice spice powder, and two tablespoons of sesame oil. Stir, turn the heat to low and let it bubble gently for three minutes while the spices blend into the tamarind sauce.

To finish the Tamarind Rice
Directions:
If you make the same amount of tamarind rice as I did, divide the rice and tamarind sauce into three portions. Put one-third of the rice and one-third of the tamarind sauce into a large bowl. Toss gently so they mix well together. You can also use a fork to combine the rice and tamarind sauce. Once the rice and tamarind sauce is well mixed put it into a large pot. Do the same with the other two parts of rice and tamarind sauce. Cover the pot and let the tamarind rice rest for at least 30 minutes before you serve. Garnish with some fresh curry leaves.

Red Kidney Bean Curry – Rajma Curry

Red Kidney Bean Curry3

Mea culpa! On Sunday, my trigger happy finger clicked the Publish button by mistake and my subscribers received a unintentional sneak preview of the pictures for Tuesday’s blog post. I hope it built up the anticipation for today’s recipe!

Red kidney bean curry, which is called rajma in Hindi, is a traditional dish prepared in almost every home in India. It is served with rice or whole wheat bread. Red kidney beans are naturally gluten free, nutritious, and well suited for those on a vegan or vegetarian diet. It is a great source of protein and good for lowering cholesterol because of its fiber content.

This recipe is ideal for a quick weeknight meal since you’ll be using canned kidney beans and spices that are already on your kitchen shelves. You can also make this dish with dried red kidney beans, but you’ll need to soak the beans overnight and then cook them in a pressure cooker the next day.

Please note that you can adjust the heat level of any recipe that I share with you, by lowering or raising the amount of green chillies, crushed red pepper flakes, black pepper, garam masala powder, or red chilli powder. The recipe below has a higher heat level, so you may wish to adjust the level to suit your family.

I wanted to take this opportunity to thank all of you that take the time to comment and “like” my blog. You inspire me to learn, teach, and share.

Red Kidney Bean Curry
Prep time: 8 minutes
Cooking time: 25 minutes
Serves: 4

Ingredients:
1lb 13 oz (822 grams) red kidney beans
3 tablespoons vegetable oil
1 bay leaf, (tej patta)
2 black cardamoms
1-inch piece cinnamon
2 cups finely chopped onion
salt
2 tablespoons ginger-garlic paste
2 cups diced tomatoes
3 green chillies, (slit down the center – adjust depending on heat and your preference)
1 teaspoon whole cumin seeds
½ teaspoon turmeric powder
2 teaspoons Kashmiri chilli powder, (depending on heat and your preference)
1 teaspoon crushed red chilli flakes, (depending on heat and your preference)
1 tablespoon coriander powder
2 teaspoons garam masala, (depending on your preference)
3 teaspoons kasori methi, (crushed in your palm)
1 cup warm water
¼ cup finely chopped cilantro
3-4 mint leaves, (torn into bits)

Directions:
Heat a heavy bottomed pot on medium-high heat. Add oil and when it shimmers add the bay leaf, black cardamoms, and cinnamon. After 30 seconds add the chopped onion and salt. Fry until the onion turns light brown. Lower the heat to medium and add the ginger-garlic paste. Fry until the raw smell of ginger-garlic disappears, then add the tomatoes and green chillies. Cook until you see the oil separate from the tomato-onion mixture.

Add cumin seeds, turmeric powder, chilli powder, crushed red chilli flakes, coriander powder, garam masala powder, and kasori methi. Cook for 30 seconds and then add the canned red kidney beans along with the liquid in the can and one cup of warm water. Turn the heat to high and let the beans come to a boil. Once it comes to a boil, turn the heat to low, and let the beans simmer for 15-20 minutes. Garnish with cilantro and mint. Serve with plain steamed rice or rotis.