Coconut Ice

Coconut IceI wonder how many of my Indian readers remember buying coconut sweets from little shops in India. They were kept in large glass jars – looking very tempting. During my high school days, my friends and I would use spare change from our allowances to buy a couple to share.

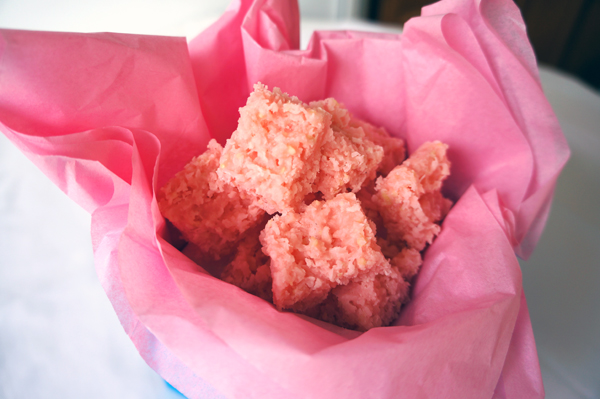
For those who have never tried these, I highly recommend them. They are similar in texture to coconut macaroons with a dash of exotic flavor. I hope you enjoy them as much as I did all those years ago.

Coconut Ice
1½ cups sugar
½ cup water
½ cup cream
2 cups unsweetened desiccated coconut
1 tablespoon ground cashew nut
1 teaspoon ghee
1 drop of red food color

Using parchment paper, line an 8×8 inch square baking pan.

Add sugar and water to a large heavy bottomed saucepan and cook over medium heat until the mixture reaches 235 degrees F on a candy thermometer. Or until the sugar and water mixture reaches one thread consistency. Being very careful, add the cream, desiccated coconut, ground cashew nut, ghee, red food color, and mix well. The color of the coconut ice should be light pink so add only a drop of red food coloring.

Immediately spread the mixture into the parchment lined pan. Press firmly and allow it to cool completely. Cut the coconut ice into squares or diamond shapes.

Kerala Red Fish Curry

Kerala Red Fish CurryThis classic Kerala fish curry is cooked in an earthenware pot that is called a “manchatti” in Malayalam. When I moved to Washington, my mom gave me a small manchatti which I used to cook the fish curry that you see in the picture. You can use any fresh, fleshy fish of your choice to make this dish. The curry tastes best the day after cooking it.

There are many variations to this dish as there are Malayalee homes! I say that because my red fish curry tastes a little different from my sister’s version. I use Kashmiri chillies to give it its bright red color and hot dry red chillies to give the dish heat. You can reduce the number of chillies to suit your taste buds. My son, likes his fish curry to be hot so the curry I make is very spicy.

Kerala Style Red Fish Curry
1 pound fish (any fleshy variety that you like)
14 dry hot red chillies
14 Kashmiri chillies
2 teaspoons coriander seeds
1 pinch fenugreek seeds
¼ teaspoon turmeric powder
4 tablespoons coconut oil
¼ teaspoon mustard seeds
1 sprig curry leaves
1 teaspoon finely chopped ginger
2 teaspoons finely chopped garlic
1 tablespoon finely chopped shallots
3 pieces of Malabar tamarind (puli)
2 cups water
salt to taste

In a small pan add the chillies, coriander, and fenugreek seeds and roast them over medium low heat. When they smell fragrant, remove, cool and powder in a spice grinder. Soak the Malabar tamarind in warm water for 15 minutes. Drain and dry on a paper towel.

Place the manchatti or pot on medium high heat. Add coconut oil and when the oil is hot add mustard seeds. When they splutter add curry leaves, ginger, garlic, shallots, and the Malabar tamarind. Fry for about 30 seconds and then add the powdered spices. Immediately add 2 cups of water and salt. Stir well and when it boils add the pieces of fish. Turn the heat to medium low and cook until the pieces are done and the gravy thickens.

Fettuccine Alfredo

Fettuccine Alfredo2I love Fettuccine Alfredo. Every time I order it at an Italian restaurant, my kids tease me for not trying something new. I just like the fact that it takes only pasta, butter, cream, Parmigiano-Reggiano, salt, and pepper to create such a heavenly dish! In preparation for this recipe, I tested several from different magazines. After a few modifications, I have finally come up with this version that my kids and I think turned out the best.

When I have unexpected guests, Fettuccine Alfredo is on my dinner menu. Its quick and requires ingredients you probably already have in your pantry and refrigerator. Serve it with thick slices of garlic bread and a hearty tossed salad. Try it and let me know what you think.

Fettuccine Alfredo
1 pound dried Fettuccine
1½ cups heavy cream
6 tablespoons unsalted butter
½ teaspoon salt
¼ teaspoon freshly ground black pepper
2 cups finely grated Parmigiano-Reggiano cheese
3 tablespoons pasta water
Fresh parsley for garnish, optional

In a saucepan, bring 1 cup heavy cream and butter to a simmer over medium heat. Reserve ½ cup of the cream for later. Lower the heat and simmer gently until the milk and butter mixture reduces to ½ cup. It will take about 15 minutes. Turn off the heat and add the remaining ½ cup of cream. Season with salt and pepper.

Using a large pot, cook the pasta according to the directions on the package. Remember to add salt to the boiling water before you add the pasta. When the pasta is cooked but still firm when bitten, reserve 3 tablespoons of the cooking water, drain the pasta, and put it back into the pot.

In a large, shallow serving bowl add half the finely grated Parmigiano-Reggiano. Pour the warm butter and cream mixture over it. Immediately add the hot pasta and the reserved pasta water. Toss well and then sprinkle the other half of the Parmigiano-Reggiano. Garnish with fresh parsley and serve right away.

Playing with Food – Carving a Tomato Rose

Tomato rose 7
Have your parents ever told you to stop playing with your food? Well, there are some professional chefs that are called Chefs du Garde Manger, who are famous and much sought after because they play with food. They are masters of sculpting ice, carving fruits and vegetables, or creating elaborate buffets.

Margaret_BangkokThe way we present food greatly enhances the appetites of our diners, and the overall experience of the meal. Even a small garnish makes a huge difference. My fascination with fruit and vegetable carving began when I first visited Thailand. It seemed like every fruit on the platter was carved. It was an insatiable feast for my eyes. I enrolled in a short course in Bangkok that taught me the basics. When I wrote my first cookbook, some of my pictures included what I had learned – an onion lotus, carrot knots, radish tulips, a watermelon basket and an onion chrysanthemum.

Today I will share with you how to make a tomato rose. There are specialized tools for vegetable and fruit carving but all you will need to make the tomato rose is a small sharp knife. I added a short video at the end of this post that might also be helpful.

Tomato Rose

You will need a sharp knife and a tomato that is ripe but firm.

Starting at the stem end of the tomato, peel a half-inch wide, thin strip of the skin all the way around the tomato, finishing at the base end. The strip must be peeled thinly so it will roll evenly.

Next place the tomato strip skin-side down, on a cutting board. It will form an elongated “S.”  Start rolling up the tomato skin to form a coil. When almost all the skin has been rolled, sit the tomato rose on its stem end.

If your rose looks odd, you’ve probably turned it upside down while rolling the peel onto the stem end. I’ve done it many times. Just turn it over.

You can use the tomato rose to garnish your dishes or it can be used for a place setting, with a personal touch, like the picture above.

Video on how to make a tomato rose