Shakarpara (Shankarpali) – Indian Biscuits

Shakarpara2
Two days to Christmas! Here’s wishing you and your family a Happy Holiday and a delicious New Year!

Christmas is a great time to build lifelong memories with your family. Keeping up with family traditions takes time, energy, and planning. I am so thankful for the memories I have of my family during this time of year.

I am sure many of you have your own Christmas traditions. Please share them with us on my Facebook page or right here on my blog. A few of our family favorites are decorating the Christmas tree, making treats with friends, having family over for Christmas Eve dinner, Secret Santa parties, and of course, a delicious breakfast on Christmas morning (cinnamon rolls are a must)!

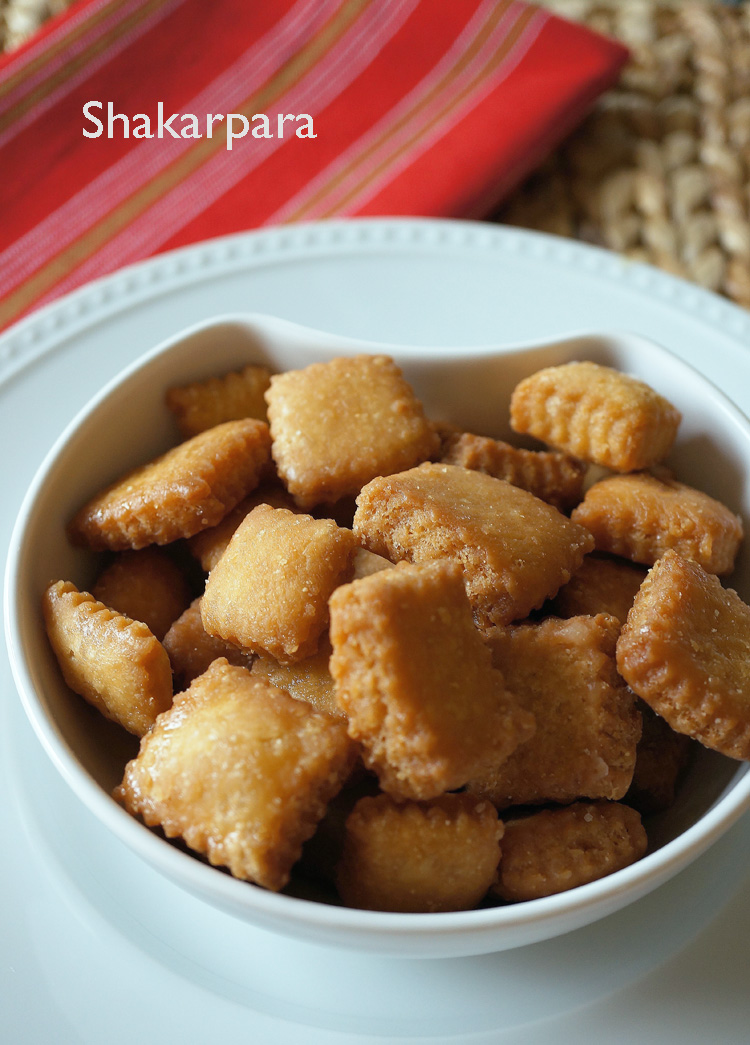
Today’s recipe is simple. You will find these little biscuits all over Maharashtra. Shakarpara or Shankarpali, as they are called, are made with all purpose flour, ghee or oil, sugar, and water. These are items you already have in your pantry. All you need to do is knead the dough, let it rest, roll, cut, and deep fry. So, you can even make them today – just in time for Santa’s arrival!

Shakarpara (Shankarpali) – Indian Biscuits
Prep time: 20 minutes (includes rest time)
Cooking time: 30 minutes

Ingredients:
1 cup granulated sugar
1 cup water
½ cup solid ghee, (or 3/4 cup vegetable oil)
5 cups all purpose flour, (approximately)
1 teaspoon salt
2 teaspoons semolina, (sooji, optional)
Oil for deep frying

Directions:
Add sugar, water, and ghee into a saucepan. Place over medium-high heat and stir until the sugar melts. Cool. Whisk flour, salt and semolina in a separate bowl until combined.

Pour the cooled sugar, water, and ghee mixture into the large bowl of an electric mixer, (Kitchen Aid), fitted with a dough hook. With the mixer on slow speed, add the flour, a little at a time, scraping down the bowl, until the mixture comes together. I needed five cups of flour. You might need to add a little more or a little less. Add flour until the mixture comes together into a ball. Turn the mixer on medium speed and knead for three minutes. You can also made the dough without a mixer. Knead with your hands until you have a smooth dough. Let the dough rest for 15 minutes. Knead it again with your hands and then divide the dough into equal portions. Roll to about 1/8 inch thick. Cut into diamond or square shapes.

Add about five inches of oil to a wok or heavy bottomed pan. Heat the oil over medium heat. Then turn the heat to medium-low. Add a small piece of dough. If it rises to the top quickly the oil is too hot. Add a few shakarparas at a time. They must come up slowly. Fry them on low heat so the inside cooks well. Remove when they turn golden brown and drain on paper-towel lined trays. Cool completely before storing them.

Notes:
– I used turbinado sugar for the shakarparas in the picture. The golden crystals are not bleached, so they keep the rich flavor and color of their natural molasses. But I found that the shakarparas were not as sweet as I would have liked, so I coated them with a sugar syrup.
– For the sugar syrup I used one cup granulated sugar and one cup water. Cooked it in a heavy-bottomed pan, over medium heat. When the sugar melted, I add quarter teaspoon lemon juice. The lemon juice keeps crystals from forming. Boil until the sugar reaches one-thread consistency. To do this, keep testing the syrup. Dip a wooden spoon into the syrup and lift out. Allow it to cool. Touch it with your forefinger and then touch your thumb and gently pull apart. When a single thread is formed and it does not break, you’ve reached one-thread consistency. Or use a candy thermometer (234° F–240° F).
– Dip the shakarparas in the syrup, drain the excess syrup with a slotted spoon, and put them on a large cookie sheet. They need to dry out before you store them.

Karanji

Karanji final

MERRY CHRISTMAS, readers! I am sure many Indian homes have Karanjis during this time of the year. They are a popular Maharashtrian sweet, but other regions in India also make them. Most often, the filling is made from dry coconut (copra), and the pastry shell is made from all purpose flour, ghee (clarified butter), and salt. You can buy ghee at any Indian grocery store. Many families have their own variation of this Christmas treat.

But, in my view, nothing came close to the karanjis made by my little sister, Sonia Poddar. They were the best I had ever tasted! They melted in my mouth. The shell was flaky, crisp, and crunchy, and the freshly grated coconut filling had just the right amount of sweetness. I asked her if I could share her recipe with you, and she graciously agreed. Thank you, Sonia.

Since these karanjis are made with fresh coconut, they are meant to be eaten soon after you make them. The recipe below will make about 20 small karanjis. If you want the karanjis to last longer, then dry roast the freshly grated coconut over medium heat until the water in the flakes of coconut evaporate, and they turn light brown, and smell fragrant.

Karanjis

For the pastry shell
1 cup all purpose flour
2 tablespoons ghee
¼ teaspoon salt
Warm water
Oil for deep frying

Rub ghee into the flour until the mixture is crumbly. Add warm water to make a smooth dough; approximately 1/3 cup of water. Cover the dough with a damp towel, and let it rest for 20-30 minutes.

For the filling
1 cup freshly grated coconut
1 cup sugar
1 cup finely chopped nuts (cashew and almond)
¼ cup golden raisins
¼ teaspoon cardamom powder
1 teaspoon poppy seeds (khus khus)

Roast poppy seeds in a small pan over low heat for one minute. Put all the ingredients in a bowl, mix well, and set aside.

Divide the dough into 20 equal sized portions and roll them into balls. Keep them covered with a wet towel so they do not dry out. Roll them into thin circles. Wet the edge of the circle with water. Put one teaspoon of the filling in the center. Gently fold over the filling to make a semi circle. Press the edge well, with your finger tips to seal. Trim the edge with a pastry cutter or karanji cutter. This will also help seal the edge of the karanji. Keep the karanjis in a tray, and cover them with a damp paper towel to keep them moist until you are ready to fry them.

Place a heavy bottomed wok (kadai) over medium-high heat, and pour oil to a depth of about five inches. Fry a few karanjis at a time until they turn light brown on both sides. Drain on paper towels.

Almond Brittle

Almond Brittle2

Happy Holidays to all my readers! Christmas is seven days away, and I’ve been busy in the kitchen making doughnuts, namkeen (Indian salty crackers), coconut ice candy, and my all-time favorite – almond brittle.

I’ve been making almond brittle for my friends during Christmas for years, so I thought I would share the recipe with you. But, before I do, let me tell you about the person who first taught me how to make almond brittle.

Sarojini Raj is her name, but to me she will always be “akka”, which in Tamil means respected and cherished older sister. I learnt so much from her. I learnt about unconditional love, and giving without expecting anything in return. I watched her manage her time efficiently. She kept an impeccable home while working full time, cooking three meals a day, and the list goes on and on. Thank you, akka, for your love, and for being such an amazing role model to me.

Almond Brittle (slightly revised)

½ stick butter (4 tablespoons), room temperature
¾ cup sugar
1/8 teaspoon salt
1 cup slivered almonds
2 tablespoons sesame seeds

Line a baking sheet with foil and set aside.

Place a heavy-bottomed saucepan over medium heat. Add butter (make sure it is at room temperature), sugar and salt. Stir with a wooden spoon until the butter, sugar and salt are well incorporated, and then add almonds and sesame seeds. Turn heat up to medium-high.

This is the point where you have to pay close attention, and keep stirring constantly. When the almonds and sugar begin to brown, and turn to a light caramel color, and you see the melted butter separate from the rest of the mixture, turn off the heat. Very carefully, pour the mixture onto the foil lined baking sheet. Spread to a thin, even layer with the back of the wooden spoon. Let the almond brittle cool completely before you snap them into pieces.

Store in an airtight container. Or, put them in little bags or boxes, as shown in the picture, and share them with your friends. They make delectable little gifts for Christmas.