Chirote – Flaky Indian pastry

Chirote2
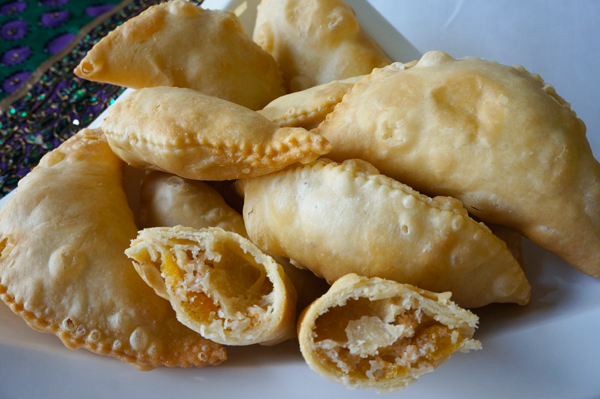
It’s time to give thanks, celebrate, and reminisce. While I was growing up, making Indian sweets, cookies, cakes, and pastries during Christmas was a family affair. It was part of our celebration. Each one of us had a specific task to do in the kitchen. Making the different fillings, kneading the dough, rolling, cutting, frying or baking – whatever it was, the whole family participated. Being the youngest in the family, I got to do the fun parts, like putting raisins in karanjis. I would put two raisins in one karanji and one in my mouth. Needless to say, I was fired from that job!

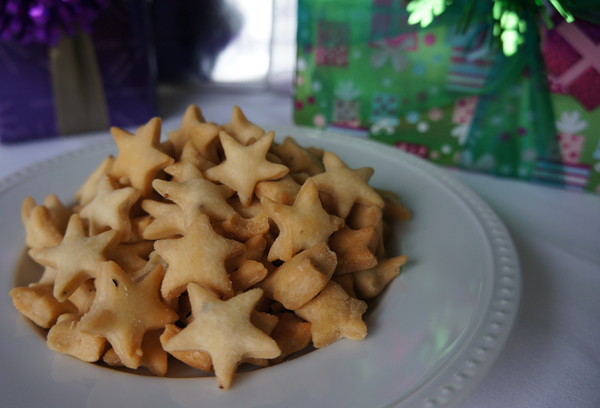
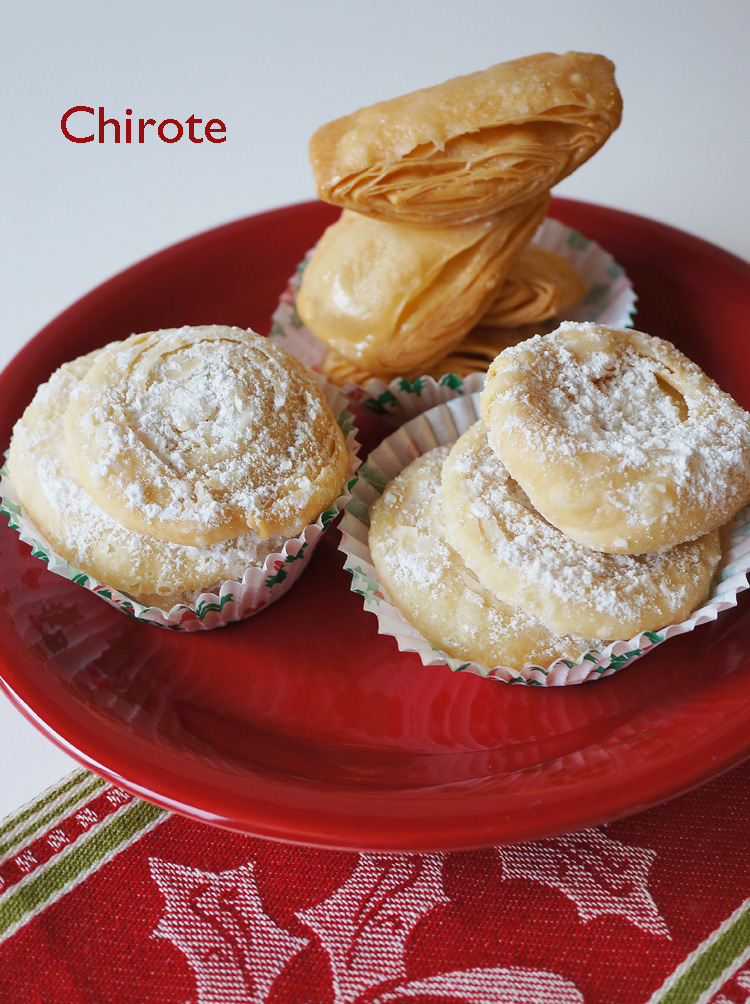
Too many of these traditions are forgotten these days. My own children don’t know how to make these delicacies. So, before these recipes are completely lost, I want to share them with you. Chirote (also spelled Chiroti) is a popular dessert from Maharashtra and Karnataka. It is a crisp, flaky, deep-fried pastry. The pastry is dipped in a sugar syrup or dusted with confectioners’ sugar. Half a teaspoon of rose water added a touch of elegance to the sugar syrup that I made.

I know that this recipe is long and it looks scary! But one way to tackle it, is to gather some of your friends and you could make them together. I’d love to know what special treats you plan to make for your families this Christmas. Please share them with me, here on my blog or on the MargaretsHome Facebook page. Thank you.

Chirote
Prep time: 1 hour (does not include time to rest dough)
Cooking time: 30 min
Makes: 20

Ingredients:
For the dough
2 cups all-purpose flour, plus 1 cup flour for dusting
3 tablespoons ghee or unsalted butter, melted
1/8 teaspoon salt
water (I used about ¾ cups)

For the rose syrup
1 cup granulated sugar
1 cup water
3 teaspoons lemon juice
½ teaspoon rose water

For the spread
2 tablespoons ghee/butter, melted
2 tablespoons rice flour

For dusting
¼ cup confectioners’ sugar
Use this to dust half the chirotes after you make them.

Directions:
For the dough
Add flour and salt into a large mixing bowl. Stir with a whisk. Make a well in the center and add melted ghee. Add a few tablespoons of water at a time and mix until the dough comes together. Knead to make a firm dough. Cover the dough with a damp towel and let it rest for one hour. You can also made the dough in a stand mixer. Use the dough hook.

For the rose syrup
In a heavy-bottomed saucepan add sugar and water. Place it over medium-high heat. Stir until the sugar dissolves. Simmer over low heat until the sugar syrup thickens (one-thread consistency), about six minutes. Turn off the heat. Stir in the lemon juice and rose essence.

For the spread
In a small bowl, mix melted ghee and rice flour until creamy. Set aside.
(If you live where it is cold during this time of the year, make this after you make the rotis. Otherwise, it will become solid and you have to put in the microwave to soften it. I know, because it happened to me!)

Put it all together
Divide the dough into six even sized portions. Roll each portion of dough between the palms of both hands, using a circular motion, to make smooth dough balls. Flatten each dough ball slightly and place it on a well floured surface. Dust some flour over it and using a rolling pin, roll it into a thin, round shape (like a roti), about 10 inches in diameter. Place each roti on a large plate or tray and cover them with a damp towel. You can place the rotis one on top of the other as long as you have dusted them with flour.

Place one roti on your work surface, smear with one teaspoon of the spread (rice flour and ghee), right to the edges. Dust with a little flour. Place the second roti over the first and again smear it with a teaspoon of the spread. Dust with flour and then place the third roti and smear it with the spread. Dust with a little flour. Starting at the lower edge, roll into a tight log. Stick the edge with a drop of water. Use a sharp knife and a sawing motion to cut the log into ½ inch pieces. Put the pieces on a plate and cover them with a damp towel. Using the same process, make another log with the remaining three dough balls.

There are two methods of making chirotes. For the first method, take one piece and keep the plain, smooth side up.  Roll lightly with a rolling pin to make a long, 2 inch chirote. For the second method, keep the cut edge up, press gently and roll lightly with a rolling pin, making a circle that is about 2½ inches in diameter. Keep them covered with a damp towel.

To show you, I used one log to make chirote which I dusted with confectioners’ sugar and the other log to make chirote that I dipped in rose syrup.

In a heavy-bottomed pot, heat oil for deep frying, over medium-high heat. Once the oil gets hot, turn the heat to medium. Drop three or four chirotes into the oil and fry them on both sides until they turn golden. Drain on paper towels. Sprinkle half of the chirotes, while they are still warm, with confectioners’ sugar. Drop the other half of the warm chirotes, a few at a time, into the rose syrup. Enjoy.

Samosa Chaat

Samosa Chaat3

Just the mention of the word “Chaat” makes my mouth water. Chaat is a word used for many of India’s favorite street foods like bhel puri and paani puri. The last time I was in India I saw a street cart with the sign, “paani puri made with mineral water.” It was nice to see that local vendors are making efforts to make chaat safe for foreigners, or locals-living-abroad, such as myself.

When I was a young girl, during my summer holidays, several schoolmates and I used to go to the Pune Cantonment swimming pool. Right after our swimming session we would stop by the street carts for our fix of samosa chaat, bhel puri, and paani puri. What fun we had! I wonder if anyone of them remembers those days.

On one of our vacations to India my children and I stopped in Mumbai. We went to a restaurant called Status. We heard they were famous for their samosa chaat. We were hungry after a whole morning of shopping. The three of us were ravenous and we ordered a whole bunch of dishes. My son ordered two plates of samosa chaat and the waiter told him that would be too much for the three of us. That one plate along with all the rest of the food that we had ordered would definitely be enough. But my son insisted on two plates. When our food came, we could hardly finish the first plate of samosa chaat. The samosas were humongous! That was a meal in itself. In the background we could hear the waiters whispering to each other with smiles on their faces.

Making samosa chaat at home is a time consuming job, but totally worth it. My friends and family have great fun assembling their own plates of samosa chaat. I made my own samosas but you can buy yours from an Indian store or restaurant. However, it is well worth making the chole, cilantro and mint chutney, and the date and tamarind chutney from scratch as homemade tastes best. So, here is my take on the famous samosa chaat.

If you plan to use dry chickpeas/garbanzo/Kabuli channa follow the Chole recipe from my previous recipe.

Chole – using canned garbanzo beans
Prep time: 10 minutes
Cooking time: 35 minutes
Serves: 6

For the spice mix

Ingredients:
3 tablespoons coriander seeds
4 black cardamoms, peel and use seeds
5 cloves
1-inch piece cinnamon stick
1 teaspoon whole black pepper
1 bay leaf, (tejpatta)
4 whole dry red chillies, (depending on heat and your preference)
2 teaspoons cumin seeds
3 tablespoons pomegranate seeds, (anardana)

Directions:
In a small pan, over low heat, roast the above mentioned ingredients until they smell fragrant and turn a very dark brown. Cool completely and then grind to a powder in a coffee grinder. Set aside.

For the Chole
Ingredients:
3 tablespoons oil
2 cups finely chopped onion
2 tablespoons finely chopped ginger
1 tablespoon finely chopped green chillies, (optional)
1 cup diced tomatoes
2 teaspoons Kashmiri chilli powder
Salt
2 15.5 oz cans of garbanzo beans
3 cups water

Directions:
In a large heavy bottomed saucepan, over medium-high heat, add oil. When the oil begins to shimmer add the onions. When they turn translucent add the ginger and fry for a minute. Add the green chillies and tomatoes. Keep stirring until the tomatoes are well cooked you see the oil separating from the tomato-onion mixture. Add the spice mix, Kashmiri chilli powder, and salt. Fry for 30 seconds.

Add the garbanzo beans along with the liquid in the cans and three cups of water. If you like the chole gravy to be a little thick, use a potato masher to mash a small portion of the garbanzo beans. Bring to a simmer and cook for an additional 30 minutes over medium-low heat, so the flavors can meld. Stir occasionally to make sure that the gravy does not stick to the bottom of the pan. Remove from heat. Serve on top of samosa chaat.

Date and Tamarind Chutney
Prep time: 10 minutes
Cooking time: 10 minutes
Serves: 6

Ingredients:
2 teaspoons cumin seeds
½ teaspoon fennel seeds
1 cup dates, pitted and roughly chopped
½ cup brown sugar
1 cup tamarind extract
3 teaspoons red chilli powder
2 teaspoons ginger powder
3 cups water
2 teaspoons chaat masala
1½ teaspoons black salt

Directions:
Add cumin and fennel seeds to a small non-stick pan. Roast over low heat until fragrant. Cool and grind to a powder.

Add cumin and fennel powder, chopped dates, brown sugar, tamarind pulp, chilli powder, ginger powder, chaat masala, salt and two cups of water to a small saucepan. Place the pan over medium-high heat. Stir and bring to a boil. Turn the heat to medium-low and continue to cook for ten minutes. Cool completely. Add to a blender and process until smooth. Transfer to a bowl. Serve with samosa chaat.

Cilantro and Mint Chutney
Prep time: 5 minutes
Cooking time: 5 minutes
Serves: 6

Ingredients:
1 cup fresh cilantro leaves
½ cup fresh mint leaves
3-4 green chillies, (depending on heat and your preference)
2 tablespoons water
Salt
1/4 tsp sugar
2 tablespoons lemon juice

Directions:
Roughly chop the cilantro, mint, and green chillies. Add to a blender and process until smooth. Use a tablespoon or two of water if necessary. Add black salt and sugar. Blend again and transfer to a bowl. Stir in lemon juice. Serve with samosa chaat

Plating and Garnishing

Ingredients:
12 Samosas, (can be warmed up in an oven at 400 degrees F for 6-8 minutes)
2 cups plain yoghurt, whipped
2 cups fine sev, (can be bought from Indian grocery store)
1 cup finely diced onion
1 cup finely diced tomato
2 tablespoons finely chopped green chillies, (optional)
¼ cup finely chopped cilantro
2 teaspoons roasted and powdered cumin seeds
2 teaspoons chaat masala
2 teaspoons chilli powder

Samosa Chaat4

Directions:
Break two samosas into four or five large chunks and put them on a plate. Pour a large spoonful of chole over them. Scatter a heaped teaspoon of chopped onion and tomato. Add a few bits of green chillies, if you like your chaat to be spicy. Sprinkle with a pinch of cumin, chilli and chaat masala powders. Drizzle a tablespoon of yoghurt, tamarind and date chutney, and cilantro and mint chutney over them. Finally top them off with sev and bits of chopped cilantro. There you have it – one of Indian’s favorite street foods!

Banana Fritters

Banana Fritters

I got the idea of making banana fritters when I ate beignets at Founding Farmers in Washington, D.C. I added the ripe banana just to give it a hint of banana flavor. I served my fritters sprinkled with confectioners’ sugar, but if you are adventurous you could serve it with chocolate or caramel sauce.

Banana Fritters
2 eggs
1 teaspoon oil
½ cup milk
1 teaspoon vanilla
3 tablespoons sugar
1¼ cup all purpose flour
1 teaspoon baking powder
1 teaspoon salt
1 very ripe mashed banana
Oil for deep frying
Confectioners’ sugar for dusting

Beat eggs, oil, milk, vanilla and sugar. Sift flour, baking powder and salt. Add to egg mixture and beat until the batter is smooth. Stir in the mashed banana.

Heat oil for deep frying in a wok over medium-high heat until shimmering but not smoking. Drop tablespoonfuls of the batter gently into the oil. Fry until both sides are lightly golden brown. Drain on paper towels and sprinkle with confectioners’ sugar while the fritters are still warm. Serve immediately.

Namkeen (Salty Crackers)

Namkeen
Happy New Year, friends. I wish each one of you peace, happiness, good health, prosperity, and good eats in 2013!

Some of you asked me to post a recipe for namkeen. Many of my recents posts have been Indian sweets, and that is because I have an insatiable sweet tooth. Namkeen is a snack that most Indian homes make for tea-time. This recipe is easy, and the namkeens are infused with nigella (kalonji), carom (ajwain), and cumin (jeera) seeds giving them a distinctive, and peppery twist.

For Christmas, I used a star shaped pastry cutter to make the namkeens shown in the picture. But you can also cut them in diamond shapes with a karanji or pizza cutter. I hope your namkeens turn out well.

Namkeen
4½ cups all purpose flour
1¼ teaspoon salt
¾ cup oil
½ teaspoon nigella seeds (kalonji)
½ teaspoon carom seeds (ajwain)
½ teaspoon cumin seeds (jeera)
¾ cup water (approximately)
Oil for deep frying

Sift flour, and salt into a large bowl. Make a well in the center of the flour, and salt mixture, and add the oil. In the palm of your hands, lightly crush the nigella, carom and cumin seeds, and add them. Mix the flour, salt, oil, and seeds until the flour is crumbly. Then add water, a little at a time, to make a stiff dough. Cover with a damp towel, and let the dough rest for 20 minutes.

Divide the dough into three parts. Knead each portion again, and make a smooth ball. Roll each ball into a circle that is ¼ inch thick. Cut into diamond shapes. Or, use a small star shaped pastry cutter to cut out little namkeens.

Heat oil in a wok (kadai) over medium-high heat. When you drop the namkeens in the oil they should drop to the bottom of the wok, and come up to the surface of the oil slowly. Each batch that you fry will take at least 10 minutes. Fry the namkeens until they are light brown on both sides. Drain on paper towels, and cool completely before you store them in an airtight container.

Karanji

Karanji final

MERRY CHRISTMAS, readers! I am sure many Indian homes have Karanjis during this time of the year. They are a popular Maharashtrian sweet, but other regions in India also make them. Most often, the filling is made from dry coconut (copra), and the pastry shell is made from all purpose flour, ghee (clarified butter), and salt. You can buy ghee at any Indian grocery store. Many families have their own variation of this Christmas treat.

But, in my view, nothing came close to the karanjis made by my little sister, Sonia Poddar. They were the best I had ever tasted! They melted in my mouth. The shell was flaky, crisp, and crunchy, and the freshly grated coconut filling had just the right amount of sweetness. I asked her if I could share her recipe with you, and she graciously agreed. Thank you, Sonia.

Since these karanjis are made with fresh coconut, they are meant to be eaten soon after you make them. The recipe below will make about 20 small karanjis. If you want the karanjis to last longer, then dry roast the freshly grated coconut over medium heat until the water in the flakes of coconut evaporate, and they turn light brown, and smell fragrant.

Karanjis

For the pastry shell
1 cup all purpose flour
2 tablespoons ghee
¼ teaspoon salt
Warm water
Oil for deep frying

Rub ghee into the flour until the mixture is crumbly. Add warm water to make a smooth dough; approximately 1/3 cup of water. Cover the dough with a damp towel, and let it rest for 20-30 minutes.

For the filling
1 cup freshly grated coconut
1 cup sugar
1 cup finely chopped nuts (cashew and almond)
¼ cup golden raisins
¼ teaspoon cardamom powder
1 teaspoon poppy seeds (khus khus)

Roast poppy seeds in a small pan over low heat for one minute. Put all the ingredients in a bowl, mix well, and set aside.

Divide the dough into 20 equal sized portions and roll them into balls. Keep them covered with a wet towel so they do not dry out. Roll them into thin circles. Wet the edge of the circle with water. Put one teaspoon of the filling in the center. Gently fold over the filling to make a semi circle. Press the edge well, with your finger tips to seal. Trim the edge with a pastry cutter or karanji cutter. This will also help seal the edge of the karanji. Keep the karanjis in a tray, and cover them with a damp paper towel to keep them moist until you are ready to fry them.

Place a heavy bottomed wok (kadai) over medium-high heat, and pour oil to a depth of about five inches. Fry a few karanjis at a time until they turn light brown on both sides. Drain on paper towels.

Almond Brittle

Almond Brittle2

Happy Holidays to all my readers! Christmas is seven days away, and I’ve been busy in the kitchen making doughnuts, namkeen (Indian salty crackers), coconut ice candy, and my all-time favorite – almond brittle.

I’ve been making almond brittle for my friends during Christmas for years, so I thought I would share the recipe with you. But, before I do, let me tell you about the person who first taught me how to make almond brittle.

Sarojini Raj is her name, but to me she will always be “akka”, which in Tamil means respected and cherished older sister. I learnt so much from her. I learnt about unconditional love, and giving without expecting anything in return. I watched her manage her time efficiently. She kept an impeccable home while working full time, cooking three meals a day, and the list goes on and on. Thank you, akka, for your love, and for being such an amazing role model to me.

Almond Brittle (slightly revised)

½ stick butter (4 tablespoons), room temperature
¾ cup sugar
1/8 teaspoon salt
1 cup slivered almonds
2 tablespoons sesame seeds

Line a baking sheet with foil and set aside.

Place a heavy-bottomed saucepan over medium heat. Add butter (make sure it is at room temperature), sugar and salt. Stir with a wooden spoon until the butter, sugar and salt are well incorporated, and then add almonds and sesame seeds. Turn heat up to medium-high.

This is the point where you have to pay close attention, and keep stirring constantly. When the almonds and sugar begin to brown, and turn to a light caramel color, and you see the melted butter separate from the rest of the mixture, turn off the heat. Very carefully, pour the mixture onto the foil lined baking sheet. Spread to a thin, even layer with the back of the wooden spoon. Let the almond brittle cool completely before you snap them into pieces.

Store in an airtight container. Or, put them in little bags or boxes, as shown in the picture, and share them with your friends. They make delectable little gifts for Christmas.

Medu Vada

20121024-175007.jpg

Medu vadais are one of my favorite tea-time snacks, but I cannot say that I am an expert at making them. However, I don’t give up easily and I think I’ve finally found the secret of making crisp on the outside, and light, and fluffy on the inside, medu vadais. As I’ve mentioned in the recipe, you have to beat the batter until it is the right consistency. You can test if the batter is ready by dropping a small dollop into a bowl of water.  If it floats, then the batter is ready.  If not, beat the batter a little more and test again.

In the picture the medu vadais I’ve made are smaller in size because I wanted to use them as a tea-time snack. If you would like to use them for breakfast or as a side dish then you may wish to make them larger in size. This recipe is not for the faint of heart. But try it out, and I am sure you will succeed. The end result are crisp, light, flavorful medu vadais so don’t give up.

Medu Vada

1 cup whole black lentils (urad dal)
1 teaspoon crushed black pepper
½ cup finely chopped onion
2 teaspoons finely chopped curry leaves
2 teaspoons finely chopped green chillies
2 teaspoons finely chopped cilantro
A pinch of asafoetida
Salt to taste
Oil for deep frying

Roast and powder
1 tablespoon black lentils (urad dal)
1 teaspoon uncooked rice

Soak the 1 cup black lentils in water, overnight. Roast one tablespoon of black lentils and one teaspoon of uncooked rice until fragrant and lightly colored. Cool completely and powder in a coffee grinder.

Drain the lentils that were soaked in water, and grind in a bender adding about two tablespoons of water. Do this in two batches scrapping down to make sure all the lentils become a smooth thick batter. Put the batter into a large bowl and fold in the roasted lentil and rice power. Beat the batter well with a spatula until light. To test if the batter us ready, drop a tiny amount into a small bowl of water if it floats the batter is ready. However, if the batter sinks you will need to beat the batter a little more.

Heat a wok over medium-high heat and add oil for deep frying. Dip your fingers in a small bowl of water. Take a heaping tablespoon of the batter and roll it into a ball. Make a hole in the center with your thumb. It should look like a small doughnut. Gently slide it into the oil.

Turn the medu vadais when the edges turn golden. Fry both sides. Drain on paper towels. Serve vadais with your favorite chutney.

Bangalore Vadais

Many years ago I worked in Bangalore, India. My best friend and I lived close to each other so we travelled to work together. On our way back home we had to pass by the vadai man on Mosque Road. There is nothing more intoxicating than the smell of deep fried vadais wafting in the air at 6:30 in the evening. We could not resist the temptation. Hot vadais wrapped in a piece of newspaper never tasted better. It had a crispy exterior and a soft center bursting with a fusion of flavors – onion, garlic, ginger, chilli, mint, cilantro and cinnamon. Those were the good old days when these simple pleasures kept two young girls giggling and happy!

Vadais are often served at tea time and as an accompaniment to a meal. They are made with different types of legumes and lentils. I have used split Bengal gram for these vadais. You will find split Bengal gram at an Indian grocery store. Split Bengal gram is a relative of chickpeas and it is used to make dal and savory dishes. It is also roasted and ground to make Bengal gram flour (besan) which is used to make various sweet and savory Indian dishes. Try this recipe and I hope your vadais and chutney turn out beautifully!

Bangalore Vadais

2 cups chana dal (split Bengal gram)
2 teaspoons dry red chilli flakes
1 teaspoon cumin seeds
1 teaspoon cinnamon powder
1 cup finely chopped onion
1 tablespoon finely chopped garlic
1 teaspoon finely chopped ginger
½ cup finely chopped cilantro leaves
1 tablespoon finely chopped green chillies
1 tablespoon finely chopped mint leaves
Salt to taste
Oil for deep frying

Wash and soak chana dal overnight. Drain well and remove two tablespoons of dal and set aside. In a blender grind coarsely the dal, chilli flakes, cumin seeds, and cinnamon powder without water. Do this in two batches and it should not be ground to a paste. Remove into a large bowl and add the rest of the ingredients except the oil. Add the two tablespoons of dal that was set aside and mix well.

Heat oil in a wok and keep it on medium-high heat throughout the frying process.

Make balls, using about three tablespoons of the vadai mixture, and flatten each one to about two inches in diameter on the palm of your hand. It helps to wet your palm and finger tips slightly before you form each vadai. Slide each vadai gently into the hot oil. Make four to five vadais at a time. Fry until golden brown on bottom, about three minutes. Turn and continue frying until golden brown on second side, another three minutes. Drain on paper towels. Repeat with the remaining vadai mixture. Serve with cilantro and mint chutney.

For the Cilantro and Mint Chutney

2 cups roughly chopped cilantro leaves
1 cup fresh mint leaves
3-4 green chillies, chopped
½ teaspoon sugar
3 tablespoons fresh lemon juice
1 tablespoon water
Salt to taste

Put all the ingredients in a blender, and purée. Serve with vadais.