Rose Cookies

Rose Cookies
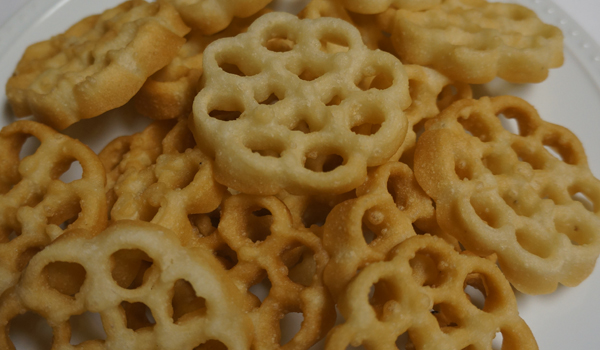
Rose cookies or “achappam” as they are called in Kerala are made during special occasions. I must warn you that they are addictive and it is difficult to stop with just one of these delightfully crisp sweet treats. This isn’t the easiest thing to make, but I can assure you that with a little practice you’ll be an expert soon. You will need a rose cookie mold to create the rose shape.

This particular recipe was handed down to me by my mom. She used fresh coconut milk unlike what I am doing in this recipe. I’ve used store bought canned coconut milk. It doesn’t taste exactly like the rose cookies my mom made but it is close enough to stifle my craving.

Rose cookies
1 cup all purpose flour
1¾ cups fine rice flour
¾ cup sugar
¼ tsp salt
1 tsp sesame seeds
½ tsp cardamom powder
2 cups coconut milk
1 cup water
Oil for deep frying

Sift the all purpose flour into a large bowl. Add the rice flour, sugar, salt, sesame seeds and cardamom powder. Mix the coconut milk and water in another bowl and then slowly pour it into the flour while stirring constantly. Stir until you have a smooth batter with no lumps. Set aside for 20 minutes.

Heat oil, for deep frying, in a wok. Place the rose cookie mold in the oil so that it will also get heated the same time as the oil. Test to see if the the oil is ready by putting a drop of batter into it. If it sizzles and comes to the surface, the oil is ready.

Gently take the mold out of the oil and dip it into the batter about three quarters of the way up. Do not dip the whole mold in the batter. You will hear it sizzle. Put the mold back into the oil and let it sit in the oil for about 40 seconds. Then gently shake the mold so that the rose cookie comes off the mold and floats in the oil. Turn it over and let the other side fry until lightly golden. Remove on to a paper towel lined baking tray. Cool completely before serving or store in an airtight container.

Banana Fritters

Banana Fritters

I got the idea of making banana fritters when I ate beignets at Founding Farmers in Washington, D.C. I added the ripe banana just to give it a hint of banana flavor. I served my fritters sprinkled with confectioners’ sugar, but if you are adventurous you could serve it with chocolate or caramel sauce.

Banana Fritters
2 eggs
1 teaspoon oil
½ cup milk
1 teaspoon vanilla
3 tablespoons sugar
1¼ cup all purpose flour
1 teaspoon baking powder
1 teaspoon salt
1 very ripe mashed banana
Oil for deep frying
Confectioners’ sugar for dusting

Beat eggs, oil, milk, vanilla and sugar. Sift flour, baking powder and salt. Add to egg mixture and beat until the batter is smooth. Stir in the mashed banana.

Heat oil for deep frying in a wok over medium-high heat until shimmering but not smoking. Drop tablespoonfuls of the batter gently into the oil. Fry until both sides are lightly golden brown. Drain on paper towels and sprinkle with confectioners’ sugar while the fritters are still warm. Serve immediately.

Coconut Ice

Coconut IceI wonder how many of my Indian readers remember buying coconut sweets from little shops in India. They were kept in large glass jars – looking very tempting. During my high school days, my friends and I would use spare change from our allowances to buy a couple to share.

For those who have never tried these, I highly recommend them. They are similar in texture to coconut macaroons with a dash of exotic flavor. I hope you enjoy them as much as I did all those years ago.

Coconut Ice
1½ cups sugar
½ cup water
½ cup cream
2 cups unsweetened desiccated coconut
1 tablespoon ground cashew nut
1 teaspoon ghee
1 drop of red food color

Using parchment paper, line an 8×8 inch square baking pan.

Add sugar and water to a large heavy bottomed saucepan and cook over medium heat until the mixture reaches 235 degrees F on a candy thermometer. Or until the sugar and water mixture reaches one thread consistency. Being very careful, add the cream, desiccated coconut, ground cashew nut, ghee, red food color, and mix well. The color of the coconut ice should be light pink so add only a drop of red food coloring.

Immediately spread the mixture into the parchment lined pan. Press firmly and allow it to cool completely. Cut the coconut ice into squares or diamond shapes.

Puri and Bhaji

Growing up in Pune, Maharashtra, my family often traveled by train to Mumbai. Traveling by train was always exciting. Whenever we stopped at a station, I would scan the platform, looking for the puri-bhaji and aloo bonda walas (vendors). Puri-bhaji is a quick and satisfying fix for hungry travelers! I remember relishing every bite – an integral part of our trip’s adventure. And as the train pulled away, we eagerly awaited the next station for dessert – the famous Lonavala chikki. Simple pleasures are what some of my memories are made of.

Today, I am sharing a recipe for puris and bhaji. Puris are whole-wheat deep-fried bread, and bhaji is a potato side dish that often accompanies puris. Puris and bhaji can be served as a meal by itself or individually as side dishes. The main ingredients for bhaji are potatoes and onions. I’ve spiced my bhaji recipe with a twist on the train platform offering. Hope you like my version!

For the Puris
2 cups wheat flour (Indian wheat flour or Pillsbury Chakki atta)
2 teaspoons oil
1½ teaspoons salt
¾ cup plus 1 tablespoon of warm water (approximately)

Put the wheat flour in a large mixing bowl, and make a well in the center of it. Add two teaspoons of oil. Mix the flour, and oil well. Add salt to the warm water, and add it to the flour. Knead to make a stiff dough. Divide the dough into 20 equal sized balls. Cover with a damp paper towel, and let it rest for 15-20 minutes.

Heat oil for deep frying in a heavy bottomed wok.

With the help of very little dry flour roll each ball into 4” diameter diskettes. Cover them with damp paper towels until all the puris are made. Deep fry on medium-high heat until light brown on both sides.

For the Bhaji
3 tablespoons vegetable oil
1 teaspoon mustard seeds
1 teaspoon cumin seeds
1 teaspoon yellow split peas (Channa dal)
1 teaspoon split black gram (Urad dal)
1 stalk curry leaves
1 teaspoon finely chopped ginger
3-4 finely chopped green chillies (adjust to your taste)
3 cups sliced red onions
3 teaspoons salt
½ teaspoon turmeric
1 diced tomato
4 cups diced boiled potatoes
1 tablespoon finely chopped cilantro

Heat oil in a large pan. Add mustard seeds, and when they splutter add cumin seeds. Lower the heat to medium, and add the yellow split peas, and wait for a minute until they they turn light brown. Add the spit black gram, stir until they also turn light brown. Then add the curry leaves, ginger, green chillies, onion, salt, and turmeric. Saute until the onion turns transparent. Add the tomato, and saute for another two minutes then add the diced potatoes. Mix gently, cover the dish, and let it cook over low heat for five minutes. Serve garnished with chopped coriander.

Namkeen (Salty Crackers)

Namkeen
Happy New Year, friends. I wish each one of you peace, happiness, good health, prosperity, and good eats in 2013!

Some of you asked me to post a recipe for namkeen. Many of my recents posts have been Indian sweets, and that is because I have an insatiable sweet tooth. Namkeen is a snack that most Indian homes make for tea-time. This recipe is easy, and the namkeens are infused with nigella (kalonji), carom (ajwain), and cumin (jeera) seeds giving them a distinctive, and peppery twist.

For Christmas, I used a star shaped pastry cutter to make the namkeens shown in the picture. But you can also cut them in diamond shapes with a karanji or pizza cutter. I hope your namkeens turn out well.

Namkeen
4½ cups all purpose flour
1¼ teaspoon salt
¾ cup oil
½ teaspoon nigella seeds (kalonji)
½ teaspoon carom seeds (ajwain)
½ teaspoon cumin seeds (jeera)
¾ cup water (approximately)
Oil for deep frying

Sift flour, and salt into a large bowl. Make a well in the center of the flour, and salt mixture, and add the oil. In the palm of your hands, lightly crush the nigella, carom and cumin seeds, and add them. Mix the flour, salt, oil, and seeds until the flour is crumbly. Then add water, a little at a time, to make a stiff dough. Cover with a damp towel, and let the dough rest for 20 minutes.

Divide the dough into three parts. Knead each portion again, and make a smooth ball. Roll each ball into a circle that is ¼ inch thick. Cut into diamond shapes. Or, use a small star shaped pastry cutter to cut out little namkeens.

Heat oil in a wok (kadai) over medium-high heat. When you drop the namkeens in the oil they should drop to the bottom of the wok, and come up to the surface of the oil slowly. Each batch that you fry will take at least 10 minutes. Fry the namkeens until they are light brown on both sides. Drain on paper towels, and cool completely before you store them in an airtight container.

Karanji

Karanji final

MERRY CHRISTMAS, readers! I am sure many Indian homes have Karanjis during this time of the year. They are a popular Maharashtrian sweet, but other regions in India also make them. Most often, the filling is made from dry coconut (copra), and the pastry shell is made from all purpose flour, ghee (clarified butter), and salt. You can buy ghee at any Indian grocery store. Many families have their own variation of this Christmas treat.

But, in my view, nothing came close to the karanjis made by my little sister, Sonia Poddar. They were the best I had ever tasted! They melted in my mouth. The shell was flaky, crisp, and crunchy, and the freshly grated coconut filling had just the right amount of sweetness. I asked her if I could share her recipe with you, and she graciously agreed. Thank you, Sonia.

Since these karanjis are made with fresh coconut, they are meant to be eaten soon after you make them. The recipe below will make about 20 small karanjis. If you want the karanjis to last longer, then dry roast the freshly grated coconut over medium heat until the water in the flakes of coconut evaporate, and they turn light brown, and smell fragrant.

Karanjis

For the pastry shell
1 cup all purpose flour
2 tablespoons ghee
¼ teaspoon salt
Warm water
Oil for deep frying

Rub ghee into the flour until the mixture is crumbly. Add warm water to make a smooth dough; approximately 1/3 cup of water. Cover the dough with a damp towel, and let it rest for 20-30 minutes.

For the filling
1 cup freshly grated coconut
1 cup sugar
1 cup finely chopped nuts (cashew and almond)
¼ cup golden raisins
¼ teaspoon cardamom powder
1 teaspoon poppy seeds (khus khus)

Roast poppy seeds in a small pan over low heat for one minute. Put all the ingredients in a bowl, mix well, and set aside.

Divide the dough into 20 equal sized portions and roll them into balls. Keep them covered with a wet towel so they do not dry out. Roll them into thin circles. Wet the edge of the circle with water. Put one teaspoon of the filling in the center. Gently fold over the filling to make a semi circle. Press the edge well, with your finger tips to seal. Trim the edge with a pastry cutter or karanji cutter. This will also help seal the edge of the karanji. Keep the karanjis in a tray, and cover them with a damp paper towel to keep them moist until you are ready to fry them.

Place a heavy bottomed wok (kadai) over medium-high heat, and pour oil to a depth of about five inches. Fry a few karanjis at a time until they turn light brown on both sides. Drain on paper towels.

Almond Brittle

Almond Brittle2

Happy Holidays to all my readers! Christmas is seven days away, and I’ve been busy in the kitchen making doughnuts, namkeen (Indian salty crackers), coconut ice candy, and my all-time favorite – almond brittle.

I’ve been making almond brittle for my friends during Christmas for years, so I thought I would share the recipe with you. But, before I do, let me tell you about the person who first taught me how to make almond brittle.

Sarojini Raj is her name, but to me she will always be “akka”, which in Tamil means respected and cherished older sister. I learnt so much from her. I learnt about unconditional love, and giving without expecting anything in return. I watched her manage her time efficiently. She kept an impeccable home while working full time, cooking three meals a day, and the list goes on and on. Thank you, akka, for your love, and for being such an amazing role model to me.

Almond Brittle (slightly revised)

½ stick butter (4 tablespoons), room temperature
¾ cup sugar
1/8 teaspoon salt
1 cup slivered almonds
2 tablespoons sesame seeds

Line a baking sheet with foil and set aside.

Place a heavy-bottomed saucepan over medium heat. Add butter (make sure it is at room temperature), sugar and salt. Stir with a wooden spoon until the butter, sugar and salt are well incorporated, and then add almonds and sesame seeds. Turn heat up to medium-high.

This is the point where you have to pay close attention, and keep stirring constantly. When the almonds and sugar begin to brown, and turn to a light caramel color, and you see the melted butter separate from the rest of the mixture, turn off the heat. Very carefully, pour the mixture onto the foil lined baking sheet. Spread to a thin, even layer with the back of the wooden spoon. Let the almond brittle cool completely before you snap them into pieces.

Store in an airtight container. Or, put them in little bags or boxes, as shown in the picture, and share them with your friends. They make delectable little gifts for Christmas.

Medu Vada

20121024-175007.jpg

Medu vadais are one of my favorite tea-time snacks, but I cannot say that I am an expert at making them. However, I don’t give up easily and I think I’ve finally found the secret of making crisp on the outside, and light, and fluffy on the inside, medu vadais. As I’ve mentioned in the recipe, you have to beat the batter until it is the right consistency. You can test if the batter is ready by dropping a small dollop into a bowl of water.  If it floats, then the batter is ready.  If not, beat the batter a little more and test again.

In the picture the medu vadais I’ve made are smaller in size because I wanted to use them as a tea-time snack. If you would like to use them for breakfast or as a side dish then you may wish to make them larger in size. This recipe is not for the faint of heart. But try it out, and I am sure you will succeed. The end result are crisp, light, flavorful medu vadais so don’t give up.

Medu Vada

1 cup whole black lentils (urad dal)
1 teaspoon crushed black pepper
½ cup finely chopped onion
2 teaspoons finely chopped curry leaves
2 teaspoons finely chopped green chillies
2 teaspoons finely chopped cilantro
A pinch of asafoetida
Salt to taste
Oil for deep frying

Roast and powder
1 tablespoon black lentils (urad dal)
1 teaspoon uncooked rice

Soak the 1 cup black lentils in water, overnight. Roast one tablespoon of black lentils and one teaspoon of uncooked rice until fragrant and lightly colored. Cool completely and powder in a coffee grinder.

Drain the lentils that were soaked in water, and grind in a bender adding about two tablespoons of water. Do this in two batches scrapping down to make sure all the lentils become a smooth thick batter. Put the batter into a large bowl and fold in the roasted lentil and rice power. Beat the batter well with a spatula until light. To test if the batter us ready, drop a tiny amount into a small bowl of water if it floats the batter is ready. However, if the batter sinks you will need to beat the batter a little more.

Heat a wok over medium-high heat and add oil for deep frying. Dip your fingers in a small bowl of water. Take a heaping tablespoon of the batter and roll it into a ball. Make a hole in the center with your thumb. It should look like a small doughnut. Gently slide it into the oil.

Turn the medu vadais when the edges turn golden. Fry both sides. Drain on paper towels. Serve vadais with your favorite chutney.

Doughnuts – Indian Style

Warning: You won’t be able to eat just one!

I have a confession to make. Just a few weeks back hurricane Sandy visited the East Coast, and in anticipation of power outages, I decided to cook several dishes. I wanted to be prepared, because when my children lose power in their homes, they end up at my place since I rarely lose power. In anticipation of their arrival, I made these doughnuts. Fortunately, my children did not lose power, but guess who ate all the doughnuts? You’re right – me! They were gone in a couple of days, and it might have been sooner, if I didn’t exercise some self control. Make these doughnuts at your own risk!

Doughnuts – Indian Style

2 cups all-purpose flour, plus more for dusting
1 cup confectioners’ sugar
¼ teaspoon salt
1½ teaspoon baking powder
1 egg
¼ cup vegetable oil or melted ghee
1 teaspoon vanilla
¼ cup milk
Peanut or canola oil for deep-frying
Confectioners’ sugar for dusting

In a bowl, sift flour, sugar, salt, and baking powder. In another bowl whisk together egg, oil and vanilla. Add egg mixture into the flour and gently mix until crumbly. Add milk little by little until the dough hold together. Add a few teaspoons of flour if the dough is sticky. Knead until it forms a nice smooth dough. Cover with a damp paper towel, and let it rest for 15 minutes.

Divide the dough into two portions. Turn one portion out on to a lightly floured work surface. Roll out to a ten inch round. Cut using a doughnut cutter which is dipped in a little flour. This helps the doughnuts to slide off the cutter easily. Do the same with the other portion of the dough. Line a platter with paper towels.

In a deep, heavy saucepan, pour in oil to a depth of two inches, and heat. When oil is hot place a few doughnuts at a time in the hot oil. Using a slotted spoon remove doughnuts when they turn golden brown on both sides. Place them on paper towel lined platter to drain. You can use a fine mesh sieve to dust the doughnuts with confectioners’ sugar. However, I like them plain so the picture doesn’t have the dusting of confectioners’ sugar.

Bangalore Vadais

Many years ago I worked in Bangalore, India. My best friend and I lived close to each other so we travelled to work together. On our way back home we had to pass by the vadai man on Mosque Road. There is nothing more intoxicating than the smell of deep fried vadais wafting in the air at 6:30 in the evening. We could not resist the temptation. Hot vadais wrapped in a piece of newspaper never tasted better. It had a crispy exterior and a soft center bursting with a fusion of flavors – onion, garlic, ginger, chilli, mint, cilantro and cinnamon. Those were the good old days when these simple pleasures kept two young girls giggling and happy!

Vadais are often served at tea time and as an accompaniment to a meal. They are made with different types of legumes and lentils. I have used split Bengal gram for these vadais. You will find split Bengal gram at an Indian grocery store. Split Bengal gram is a relative of chickpeas and it is used to make dal and savory dishes. It is also roasted and ground to make Bengal gram flour (besan) which is used to make various sweet and savory Indian dishes. Try this recipe and I hope your vadais and chutney turn out beautifully!

Bangalore Vadais

2 cups chana dal (split Bengal gram)
2 teaspoons dry red chilli flakes
1 teaspoon cumin seeds
1 teaspoon cinnamon powder
1 cup finely chopped onion
1 tablespoon finely chopped garlic
1 teaspoon finely chopped ginger
½ cup finely chopped cilantro leaves
1 tablespoon finely chopped green chillies
1 tablespoon finely chopped mint leaves
Salt to taste
Oil for deep frying

Wash and soak chana dal overnight. Drain well and remove two tablespoons of dal and set aside. In a blender grind coarsely the dal, chilli flakes, cumin seeds, and cinnamon powder without water. Do this in two batches and it should not be ground to a paste. Remove into a large bowl and add the rest of the ingredients except the oil. Add the two tablespoons of dal that was set aside and mix well.

Heat oil in a wok and keep it on medium-high heat throughout the frying process.

Make balls, using about three tablespoons of the vadai mixture, and flatten each one to about two inches in diameter on the palm of your hand. It helps to wet your palm and finger tips slightly before you form each vadai. Slide each vadai gently into the hot oil. Make four to five vadais at a time. Fry until golden brown on bottom, about three minutes. Turn and continue frying until golden brown on second side, another three minutes. Drain on paper towels. Repeat with the remaining vadai mixture. Serve with cilantro and mint chutney.

For the Cilantro and Mint Chutney

2 cups roughly chopped cilantro leaves
1 cup fresh mint leaves
3-4 green chillies, chopped
½ teaspoon sugar
3 tablespoons fresh lemon juice
1 tablespoon water
Salt to taste

Put all the ingredients in a blender, and purée. Serve with vadais.