Boondi Ladoo

Boondi Ladoo2

Happy Diwali to my readers and friends who celebrate the Indian Festival of Lights. May the new year bring you and your family prosperity, good health, and happiness.

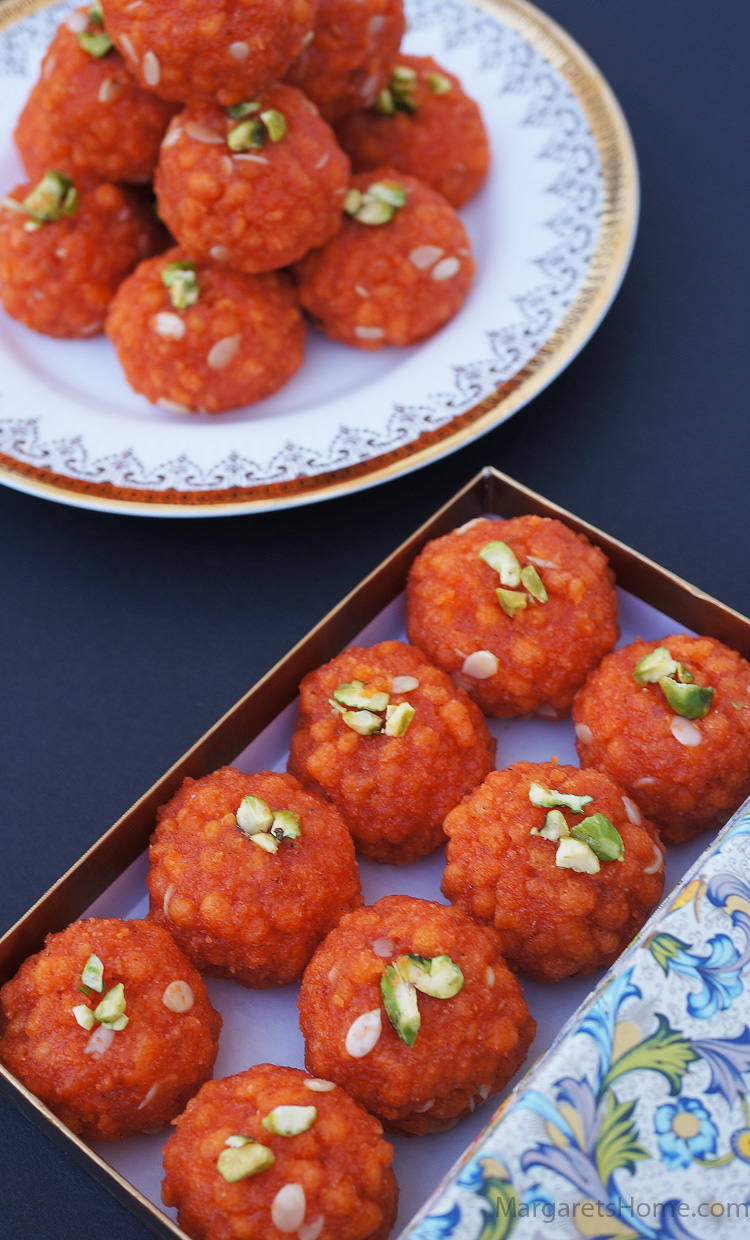
When I walked into my local Indian grocery store the shelves were full of Indian sweets. My mouth was watering and memories of my time in India flooded my mind. I remember oil lamps on the porch of almost every home, firecrackers lighting the skies, children dressed is new outfits, neighbors sharing sweets with each other, and the aroma of wonderful sweets being prepared wafting in the air. Right then I decided to make boondi ladoos and bought all the ingredients I needed and headed for my kitchen.

Boondi ladoos are not the easiest to make but if you have patience, pay close attention to the measurements of the ingredients, read the instructions and notes carefully, you too can make boondi ladoos that you can enjoy and share with your friends. You will also need a boondi maker (to make the small balls, which are called boondi in Hindi, that collectively make each ladoo) or a skimmer – a flat ladle with holes in it to make the boondi. The Indian grocery stores in the U.S. carry it. I added a twist to the fragrance and taste of these boondi ladoos with orange blossom water and red rose water. I hope you will enjoy my version of boondi ladoo.

Boondi Ladoo
Prep time: 15 minutes
Cooking time: 35 minutes
Makes: 20

For the boondi:
2 cups Bengal gram flour, (besan)
1 pinch of baking soda
1 pinch salt
1 pinch of orange food color powder, (optional)
1¼ cups water
Oil for deep frying
2 tablespoons lightly roasted melon seeds
1 tablespoon chopped pistachios

For the syrup:
2 cups sugar
1½ cups water
2 pinches of orange food color powder, (optional)
1 teaspoon orange blossom water
1 teaspoon red rose water
1 teaspoon of cardamom powder, (optional)

Sift gram flour, baking soda, salt and food color into a large bowl. Add half the water and mix with a wooden spoon. Add the rest of the water a little at a time and stir until the batter is smooth. The batter is the right consistency when it drops through the holes of the skimmer easily. Let the batter rest while you make the syrup.

In a large pan combine sugar and water and boil for 15 minutes over medium heat. Brush the sides of the pan with water as it is boiling, so that the sugar does not crystallize and use a candy thermometer. The syrup is ready when the thermometer reads 220 F. Another way to check whether the syrup is ready, if you don’t have a candy thermometer, is when you touch a drop of cooled syrup between your forefinger and thumb, a thin string is formed. Turn off the heat. Add food color, orange blossom water, rose water, and cardamom powder. Add the melon seeds and stir well.

Heat oil in a wok to 350 F. Pour a small amount of batter on the skimmer and tiny droplets of the batter will fall through the holes in the skimmer, into the oil, and form boondis. Hold the skimmer about two inches from the oil to form round boondis. Of course, you need to be careful when you do this. As soon as the bubbles stop forming around the boondis (the boondis should not be crisp and turn brown) drain the oil with a slotted ladle and put them into the syrup. Stir them every time you put a new batch of boondis into the syrup.

Mix until all the boondi and melon seeds are well coated with syrup. When the mixture is cool enough to handle make ladoos. Garnish with chopped pistachios.

Notes:
– If the batter is too thick the boondi will be flat. Add a few drops of water at a time to get the batter to the right consistency so the boondis will be round.
– Hold the skimmer about two inches from the oil, otherwise your boondi will have tails.
– You will see black specks on the ladoos if you add cardamom powder. So you can avoid that by just using the orange blossom water and red rose water.
– Start making the ladoos as soon as possible. If you let the mixture get cold you will not be able to form ladoos.
– You can also put the boondi and syrup mixture into the bowl of a stand mixer with a paddle and run it for about five minutes. If the mixture does not come together to form a ball, add 5-6 tablespoon of boiling hot water, while the mixer is on and run it for another five minutes.

Vote for my Almond Brittle Recipe

almond-brittle24

The holidays are just around the corner, and during this time, many of my friends ask for my Almond Brittle recipe. I’m reposting the recipe below, and I’ve also entered it in the Fisher Nuts “My Fresh Twist” recipe contest. Click here to vote for my recipe! You can vote for my recipe five times a day until November 5. Hint: Just hit the vote button 5 times in a row! Many of you have tried and tasted my Almond Brittle so I am sure I’ll get your vote. Thanks for your support.

This recipe was originally posted on December 18, 2012.

Almond Brittle
½ stick butter (4 tablespoons), room temperature
¾ cup sugar
1/8 teaspoon salt
1 cup slivered almonds
2 tablespoons sesame seeds

Line a baking sheet with foil and set aside.

Place a heavy-bottomed saucepan over medium heat. Add butter (make sure it is at room temperature), sugar and salt. Stir with a wooden spoon until the butter, sugar and salt are well incorporated, and then add almonds and sesame seeds. Turn heat up to medium-high.

This is the point where you have to pay close attention, and keep stirring constantly. When the almonds and sugar begin to brown, and turn to a light caramel color, and you see the melted butter separate from the rest of the mixture, turn off the heat. Very carefully, pour the mixture onto the foil lined baking sheet. Spread to a thin, even layer with the back of the wooden spoon. Let the almond brittle cool completely before you snap them into pieces.

Store in an airtight container. Or, put them in little bags or boxes, as shown in the picture, and share them with your friends. They make delectable little gifts for Christmas.

Video tips for perfecting your almond brittle

MargaretsHome.com Turns One – Celebrating with a GiveAway

Mango and White Chocolate3

MargaretsHome.com turns one year old today! To celebrate, you, my dear reader, are invited to take part in a giveaway. The giveaway is not sponsored, it’s just my way of saying, “Thank you,” for taking the time to subscribe to my blog and participate with your comments. You keep me motivated and inspired. Giveaway details are at the end of this post.

I must confess that blogging is time-consuming when you do everything by yourself – shop for ingredients, cook, set up a photo-shoot, take a “million” photos, clean up, write, edit, and finally post. Photography is the most challenging part for me, but, its totally worth it when I get comments like, “I don’t like it when I drool on my keyboard,” and, “Wow. . .my mouth is watering. . .I am going to try and make this.” So, please keep your feedback coming.

For those of you that have been part of my blogging journey, I’ve posted my favorite mango and white chocolate cheesecake recipe. A piece of this cheesecake will make you feel like you’re in heaven!

Mango and White Chocolate Cheesecake
Adapted from Gourmet Baking

For the Crust
1 1/3 cup almond flour
½ cup graham cracker crumbs
2 tablespoons + 1 teaspoon granulated sugar
3 tablespoons butter, melted

Preheat the oven to 350 degrees F and set a rack in the middle. Line the bottom of six mini springform cake pans with parchment paper.

Mix all the ingredients for the crust. Put three tablespoons + 1 teaspoon of the mixture into the bottom of each mini pan and press lightly to make the crust. Put the mini pans on a 12×17 inch baking sheet. Bake for 15 minutes or until slightly brown. Cool while you prepare the cheesecake batter.

For the Mango and White Chocolate Cheesecake Batter
3 (8 ounce) packages cream cheese, room temperature
½ cup sugar
3 eggs
2/3 cups white chocolate chips
2/3 cups mango puree, (I used Alfanso mango puree from the Indian grocery store)
1 teaspoon vanilla extract

In a metal bowl, over a pan of simmering water, melt chocolate chips, stirring occasionally until smooth.

In a large bowl, of a stand mixer with the paddle attachment, mix together cream cheese and sugar until smooth. Beat in eggs, one at a time. Blend in the melted white chocolate, mango puree, and vanilla.

Divide the cheesecake batter into six equal portions and pour the batter over the cooled crust in mini pans. Bake in a water bath at 300 degrees F for 50-60 minutes. Or, until the edges are set but the center is still slightly jiggly. Cool and refrigerate overnight.

For the Mango Jelly
1½ cups mango puree
½ cup sugar
2 teaspoons unflavored gelatin
1 tablespoon water

Add mango puree and sugar to a small saucepan and bring it to a gentle boil. Add a tablespoon of water to the gelatin and microwave for 10 seconds. Stir into the mango puree. Remove from heat and cool in an ice bath to room temperature. Once cool divide the amount of jelly into six equal portions. Pour over the mini cheesecakes. Refrigerate overnight.

For the Garnish
1 small bunch champagne grapes
½ cup strawberries
½ cup blueberries
½ cup raspberries
a few mint leaves

For the Glaze
½ cup sugar
1 cup passion fruit juice
2 tablespoons corn starch
2 tablespoons corn syrup

In a small saucepan, over medium-high heat, bring sugar and half cup passion fruit juice to a boil. Dissolve cornstarch in the other half cup of passion fruit juice and add it to the saucepan. Cook, stirring until mixture thickens and looks clear. Stir in corn syrup. Bring to a boil then remove from heat. Cool completely.

To Finish
Remove the cheesecake from the pans and set them on small cardboard cake rounds. It helps to use a hair dryer on low heat to remove the cheesecake easily.

Decorate each cheese cake with a few grapes, strawberries, blueberries, raspberries and mint leaves. Add a touch of glaze over the fruits. There you have it! My favorite mango and white chocolate cheesecake.

THE ANNIVERSARY GIVEAWAY – this giveaway closed on September 30, 2013.
How to Enter:
1. Visit http://www.margaretshome.com and subscribe by e-mail to MargaretsHome.com (use the subscribe button at the top right). One lucky winner will be randomly chosen from my e-mail subscriber’s list. If you’ve already subscribed, you don’t have to subscribe again.
2. Leave a comment on the giveaway post (today’s post dated, September 10, 2013). Only one comment per person, multiple comments are welcome but only count as one entry.

Official Giveaway Rules:
1. Eligibility: This giveaway is open to readers with US shipping addresses (No P.O. Box). Void where prohibited by law.
2. Minimum age for entry: You must be 18 years of age or older to enter.
3. How to enter: Subscribe to margaretshome.com. and leave a comment on this blog post. (If you have already subscribed, you don’t have to subscribe again. Just make sure you enter a comment on this blog post.)
4. Entry limit: A limit of one entry is allowed per e-mail address. You may not enter more than once, whether or not you use a different e-mail address. No e-mail address equals no valid entry.
5. Entry Deadline Date: All entries for this giveaway through this site must be received on or before September 30, 2013, at 8:00 p.m. (EST).
6. Winner selection: Winner will be chosen randomly.
7. Winner notification: Winner will be notified within five (5) days after the closing deadline date.
8. Claiming Your Prize: Winner must respond within five days of notification and provide me with a mailing address (No P.O. Box) or forfeit the prize, in which case an alternate winner will be selected.
9. Publicity: Acceptance of prize constitutes the winner giving the owner of Margaretshome.com permission to announce your name and prize on a blog post.
10. Prize: The prize is a Multifunctional Digital Kitchen Scale worth approximately $40.00. Winner may not substitute the prize for any other prize or for cash.
11. Privacy: Your privacy is important to me. I will not disclose your address or phone number when required to ship your prize, to anyone except if I use a company to ship your prize. Your e-mail will not be shared or sold.
12. Purchases: No purchase or payment of any kind is necessary to enter or win this giveaway.
13. Chances of winning: Odds of winning are based on number of entries.
14. Disclaimer. The owner of Margaretshome.com will not be responsible for a) any late or lost entries; b) telephone, electronic, hardware, software, network, Internet, or other computer or communications-related malfunctions or failures; any giveaway disruptions, injuries, losses or damages caused by events beyond the control of the owner of Margaretshome.com blog or by unauthorized human intervention; or c) any printing or typographical errors in any materials associated with the giveaway.

Good luck!

Blueberry Coffee Cake

Blueberry Coffee cake6I hope all of you had a wonderful Memorial Day weekend! My daughter-in-law, Dharti, graduated with a Masters in Psychology so our family and friends celebrated all weekend. The blueberry coffee cake was part of brunch on Monday morning and one of my toughest food critics, my son, said this was his new favorite cake. I hope it will become one of your favorites too.

Here’s a quick tip before you dive in: Dust the blueberries with flour before you fold them into the cake and also when you scatter them on top. This keeps them from sinking to the bottom of the cake while it bakes.

Blueberry Coffee Cake
Adapted from The Complete America’s Test Kitchen TV Show Cookbook

For the Cake
2 cups flour plus 1 teaspoon
1 tablespoon baking powder
1 teaspoon salt
2 sticks unsalted butter, softened
¾ cup packed light brown sugar
½ cup granulated sugar
3 large eggs
1 cup whole milk
½ cup fresh blueberries

For the Topping
½ cup fresh blueberries
¼ cup granulated sugar
½ teaspoon ground cinnamon

Heat oven to 350 degrees. Grease and flour a 9×13 inch baking pan.

For the Cake
Sift two cups of flour, baking powder, and salt into a medium bowl. Using an electric mixer, beat butter and sugar on medium-high speed until fluffy. It will take about two minutes. Add the eggs, one at a time, beating after each addition until incorporated. Turn the mixer to low speed, add one-third of the flour mixture and beat until incorporated. Then beat in half of the milk. Add half of the remaining flour, beating until incorporated and then add the remaining half cup of milk. Finally add the remaining flour and beat until incorporated.

Toss the blueberries in a small bowl with half a teaspoon of flour. Make sure that the blueberries are coated with flour before you gently fold them into the batter. Spread the batter into the prepared pan and make the topping.

For the Topping
Toss the blueberries with the remaining half teaspoon of flour and scatter them over the top of the batter. Mix sugar and cinnamon in a small bowl and sprinkle evenly over the batter. Bake on the middle rack of your oven for 45 minutes. Cool in the pan for 20 minutes and then cut and arrange them on a cake platter. They taste heavenly when eaten warm.

Rose Cookies

Rose CookiesRose cookies or “achappam” as they are called in Kerala are made during special occasions. I must warn you that they are addictive and it is difficult to stop with just one of these delightfully crisp sweet treats. This isn’t the easiest thing to make, but I can assure you that with a little practice you’ll be an expert soon. You will need a rose cookie mold to create the rose shape.

This particular recipe was handed down to me by my mom. She used fresh coconut milk unlike what I am doing in this recipe. I’ve used store bought canned coconut milk. It doesn’t taste exactly like the rose cookies my mom made but it is close enough to stifle my craving.

Rose cookies
1 cup all purpose flour
1¾ cups fine rice flour
¾ cup sugar
¼ tsp salt
1 tsp sesame seeds
½ tsp cardamom powder
2 cups coconut milk
1 cup water
Oil for deep frying

Sift the all purpose flour into a large bowl. Add the rice flour, sugar, salt, sesame seeds and cardamom powder. Mix the coconut milk and water in another bowl and then slowly pour it into the flour while stirring constantly. Stir until you have a smooth batter with no lumps. Set aside for 20 minutes.

Heat oil, for deep frying, in a wok. Place the rose cookie mold in the oil so that it will also get heated the same time as the oil. Test to see if the the oil is ready by putting a drop of batter into it. If it sizzles and comes to the surface, the oil is ready.

Gently take the mold out of the oil and dip it into the batter about three quarters of the way up. Do not dip the whole mold in the batter. You will hear it sizzle. Put the mold back into the oil and let it sit in the oil for about 40 seconds. Then gently shake the mold so that the rose cookie comes off the mold and floats in the oil. Turn it over and let the other side fry until lightly golden. Remove on to a paper towel lined baking tray. Cool completely before serving or store in an airtight container.

Banana Fritters

Banana Fritters

I got the idea of making banana fritters when I ate beignets at Founding Farmers in Washington, D.C. I added the ripe banana just to give it a hint of banana flavor. I served my fritters sprinkled with confectioners’ sugar, but if you are adventurous you could serve it with chocolate or caramel sauce.

Banana Fritters
2 eggs
1 teaspoon oil
½ cup milk
1 teaspoon vanilla
3 tablespoons sugar
1¼ cup all purpose flour
1 teaspoon baking powder
1 teaspoon salt
1 very ripe mashed banana
Oil for deep frying
Confectioners’ sugar for dusting

Beat eggs, oil, milk, vanilla and sugar. Sift flour, baking powder and salt. Add to egg mixture and beat until the batter is smooth. Stir in the mashed banana.

Heat oil for deep frying in a wok over medium-high heat until shimmering but not smoking. Drop tablespoonfuls of the batter gently into the oil. Fry until both sides are lightly golden brown. Drain on paper towels and sprinkle with confectioners’ sugar while the fritters are still warm. Serve immediately.

Coconut Ice

Coconut IceI wonder how many of my Indian readers remember buying coconut sweets from little shops in India. They were kept in large glass jars – looking very tempting. During my high school days, my friends and I would use spare change from our allowances to buy a couple to share.

For those who have never tried these, I highly recommend them. They are similar in texture to coconut macaroons with a dash of exotic flavor. I hope you enjoy them as much as I did all those years ago.

Coconut Ice
1½ cups sugar
½ cup water
½ cup cream
2 cups unsweetened desiccated coconut
1 tablespoon ground cashew nut
1 teaspoon ghee
1 drop of red food color

Using parchment paper, line an 8×8 inch square baking pan.

Add sugar and water to a large heavy bottomed saucepan and cook over medium heat until the mixture reaches 235 degrees F on a candy thermometer. Or until the sugar and water mixture reaches one thread consistency. Being very careful, add the cream, desiccated coconut, ground cashew nut, ghee, red food color, and mix well. The color of the coconut ice should be light pink so add only a drop of red food coloring.

Immediately spread the mixture into the parchment lined pan. Press firmly and allow it to cool completely. Cut the coconut ice into squares or diamond shapes.

Karanji

Karanji final

MERRY CHRISTMAS, readers! I am sure many Indian homes have Karanjis during this time of the year. They are a popular Maharashtrian sweet, but other regions in India also make them. Most often, the filling is made from dry coconut (copra), and the pastry shell is made from all purpose flour, ghee (clarified butter), and salt. You can buy ghee at any Indian grocery store. Many families have their own variation of this Christmas treat.

But, in my view, nothing came close to the karanjis made by my little sister, Sonia Poddar. They were the best I had ever tasted! They melted in my mouth. The shell was flaky, crisp, and crunchy, and the freshly grated coconut filling had just the right amount of sweetness. I asked her if I could share her recipe with you, and she graciously agreed. Thank you, Sonia.

Since these karanjis are made with fresh coconut, they are meant to be eaten soon after you make them. The recipe below will make about 20 small karanjis. If you want the karanjis to last longer, then dry roast the freshly grated coconut over medium heat until the water in the flakes of coconut evaporate, and they turn light brown, and smell fragrant.

Karanjis

For the pastry shell
1 cup all purpose flour
2 tablespoons ghee
¼ teaspoon salt
Warm water
Oil for deep frying

Rub ghee into the flour until the mixture is crumbly. Add warm water to make a smooth dough; approximately 1/3 cup of water. Cover the dough with a damp towel, and let it rest for 20-30 minutes.

For the filling
1 cup freshly grated coconut
1 cup sugar
1 cup finely chopped nuts (cashew and almond)
¼ cup golden raisins
¼ teaspoon cardamom powder
1 teaspoon poppy seeds (khus khus)

Roast poppy seeds in a small pan over low heat for one minute. Put all the ingredients in a bowl, mix well, and set aside.

Divide the dough into 20 equal sized portions and roll them into balls. Keep them covered with a wet towel so they do not dry out. Roll them into thin circles. Wet the edge of the circle with water. Put one teaspoon of the filling in the center. Gently fold over the filling to make a semi circle. Press the edge well, with your finger tips to seal. Trim the edge with a pastry cutter or karanji cutter. This will also help seal the edge of the karanji. Keep the karanjis in a tray, and cover them with a damp paper towel to keep them moist until you are ready to fry them.

Place a heavy bottomed wok (kadai) over medium-high heat, and pour oil to a depth of about five inches. Fry a few karanjis at a time until they turn light brown on both sides. Drain on paper towels.

Almond Brittle

Almond Brittle2

Happy Holidays to all my readers! Christmas is seven days away, and I’ve been busy in the kitchen making doughnuts, namkeen (Indian salty crackers), coconut ice candy, and my all-time favorite – almond brittle.

I’ve been making almond brittle for my friends during Christmas for years, so I thought I would share the recipe with you. But, before I do, let me tell you about the person who first taught me how to make almond brittle.

Sarojini Raj is her name, but to me she will always be “akka”, which in Tamil means respected and cherished older sister. I learnt so much from her. I learnt about unconditional love, and giving without expecting anything in return. I watched her manage her time efficiently. She kept an impeccable home while working full time, cooking three meals a day, and the list goes on and on. Thank you, akka, for your love, and for being such an amazing role model to me.

Almond Brittle (slightly revised)

½ stick butter (4 tablespoons), room temperature
¾ cup sugar
1/8 teaspoon salt
1 cup slivered almonds
2 tablespoons sesame seeds

Line a baking sheet with foil and set aside.

Place a heavy-bottomed saucepan over medium heat. Add butter (make sure it is at room temperature), sugar and salt. Stir with a wooden spoon until the butter, sugar and salt are well incorporated, and then add almonds and sesame seeds. Turn heat up to medium-high.

This is the point where you have to pay close attention, and keep stirring constantly. When the almonds and sugar begin to brown, and turn to a light caramel color, and you see the melted butter separate from the rest of the mixture, turn off the heat. Very carefully, pour the mixture onto the foil lined baking sheet. Spread to a thin, even layer with the back of the wooden spoon. Let the almond brittle cool completely before you snap them into pieces.

Store in an airtight container. Or, put them in little bags or boxes, as shown in the picture, and share them with your friends. They make delectable little gifts for Christmas.

Doughnuts – Indian Style

Warning: You won’t be able to eat just one!

I have a confession to make. Just a few weeks back hurricane Sandy visited the East Coast, and in anticipation of power outages, I decided to cook several dishes. I wanted to be prepared, because when my children lose power in their homes, they end up at my place since I rarely lose power. In anticipation of their arrival, I made these doughnuts. Fortunately, my children did not lose power, but guess who ate all the doughnuts? You’re right – me! They were gone in a couple of days, and it might have been sooner, if I didn’t exercise some self control. Make these doughnuts at your own risk!

Doughnuts – Indian Style

2 cups all-purpose flour, plus more for dusting
1 cup confectioners’ sugar
¼ teaspoon salt
1½ teaspoon baking powder
1 egg
¼ cup vegetable oil or melted ghee
1 teaspoon vanilla
¼ cup milk
Peanut or canola oil for deep-frying
Confectioners’ sugar for dusting

In a bowl, sift flour, sugar, salt, and baking powder. In another bowl whisk together egg, oil and vanilla. Add egg mixture into the flour and gently mix until crumbly. Add milk little by little until the dough hold together. Add a few teaspoons of flour if the dough is sticky. Knead until it forms a nice smooth dough. Cover with a damp paper towel, and let it rest for 15 minutes.

Divide the dough into two portions. Turn one portion out on to a lightly floured work surface. Roll out to a ten inch round. Cut using a doughnut cutter which is dipped in a little flour. This helps the doughnuts to slide off the cutter easily. Do the same with the other portion of the dough. Line a platter with paper towels.

In a deep, heavy saucepan, pour in oil to a depth of two inches, and heat. When oil is hot place a few doughnuts at a time in the hot oil. Using a slotted spoon remove doughnuts when they turn golden brown on both sides. Place them on paper towel lined platter to drain. You can use a fine mesh sieve to dust the doughnuts with confectioners’ sugar. However, I like them plain so the picture doesn’t have the dusting of confectioners’ sugar.